Building zed-news – an automated news podcast
powered by Python, LLMs and 11ty

Building, breaking and fixing things. Learning something new everyday.
I have always been terrible when it comes to staying up to date with the latest news. One day, while reading the Hacker Newsletter, I came across Hackercast – an AI-generated podcast summary of Hacker News. I was deeply fascinated, and this triggered a 💡 moment – this could be the solution to my staying up-to-date with the news problem!
So, without any knowledge and experience in building things with LLMs, I decided to embark on a quest to build a tool that automatically gathers news from various sources in my country 🇿🇲, summarizes the news articles and produces a podcast, without my input!
TLDR; here's the result, and here's the code.
The rationale
When starting this project, I already knew from the Hackercast project that I needed to
scrape various news websites,
use Langchain to summarize the news articles and
use AWS Polly to convert text to speech.
I was already familiar with using requests and Beautiful Soup for scraping, but I had to learn how to use Langchain and AWS Polly. I tried to consider alternatives to AWS Polly but after doing some bit of searching and experimentation, I concluded that AWS Polly was the best tool for the job, because of its
reasonable pricing
nice, straightforward API via Boto3.
many language options and features
nice documentation
excellent integration with S3, which means that I have fewer headaches about where to store the audio files.
However, scraping, summarization and text-to-speech were only a small piece of the puzzle. I had to think about how the whole thing was going to work. Remember, the problem I'm trying to solve here is staying up to date with the latest news. I do not have time to scour through news websites and read the news, so this tool I'm building should do the job, and tell me what's going on! From the onset, I wanted
the news to be automatically delivered every weekday in the afternoon, towards the end of my work day, so I can listen to the news on my commute or something along those lines. This has cron written all over it!
the news to be accessible from anywhere, on multiple podcast platforms. This meant I had to build my own web application with HTML Audio and a proper RSS feed which would be submitted to the various platforms.
AWS Polly, S3 and OpenAI are not free. It didn't make sense to build a web application that would require additional expenses for hosting, since the main content would be audio files, which would be on an S3 bucket. I therefore concluded that I would have to build a static site and deploy it for free via services like Github Pages, Cloudflare Pages, render, etc.
Now, which static site generator do I use? This being a Python project, I could have used the likes of Pelican or even Frozen Flask. However, it's been a while since I played around with Pelican, and I've never even used Frozen Flask. Besides, using Flask would be overkill for this. I was already learning so many things, and didn't want to spend too much time tinkering with shiny new toys, at the expense of actually solving the problem at hand and getting things done. So I resorted to using 11ty, which I was very familiar with and had used recently. I particularly love 11ty as I find it simple to use, yet very powerful and unopinionated, which means I can build anything with it, with the freedom to choose which template engine to use, how to structure my project, which build tools to use, etc.
To sum it up, I broke down the project into two main components:
the core – which consists of the Python code that handles the fetching of news items, summarization, audio production and creation of content to be passed to the web app.
the web app – which renders the generated content.
Now, you may ask, "What's with the name?". Well, I chose zed-news because Zed is for Zambia, and this whole project is a podcast consisting of news curated from Zambian sources. That makes sense, right? Well, naming things is hard!
The experience
Building zed-news was an interesting and fun challenge. I learnt a lot of things along the way, and I had to rewrite some things and make some important implementation decisions. I will highlight a few noteworthy aspects here.
Making things less "robotic" and more "natural"
The result of this project is an audio file consisting of the news read by an AWS Polly voice. To minimise monotony and avoid having each episode sound the same,
I grouped several phrases/sentences and picked a random one at various points when constructing the transcript. Here's an example
  import random

  def random_dig_in():
      variations = [
          "Without any more delay, let's jump right in.",
          "No time to waste, let's get started.",
          "Let's not wait any longer, it's time to delve in.",
          "Without further ado, let's dive in.",
          "Without prolonging the anticipation, let's begin our exploration.",
          "Time to embark on our news journey. Let's get to it.",
      ]

      return random.choice(variations)
I used the num2words library to convert numbers to words. This was particularly useful for generating ordinal numbers like seventh or thirty-first. Here's an example of how I used it
  import random
  from num2words import num2words

  read = ""
  # ...
  # ...
  # Iterate over each article in the source
  for index, article in enumerate(articles_by_source[source], start=1):
      count = num2words(index)
      count_ordinal = num2words(index, to="ordinal")
      count_variations = [
          f"Entry number {count} ",
          f"The {count_ordinal} entry ",
      ]
      title = article["title"]
      read += f"{random.choice(count_variations)} is entitled '{title}' "
Keeping track of the episode number
Because I wanted to have this project run on auto-pilot, I needed a way for it to know that today's episode is number 8, for example. Initially, I thought I was going to run this every day, so I based the episode number on the first date the podcast was published. However, I quickly saw that this would be a problem because anything could go wrong and no podcasts would be published on certain days. Besides, I later decided to just run this on weekdays. Therefore, I needed to keep track of the episode number so that I could just increment when publishing a new episode.
Serverless Postgres with Neon
I decided to not only keep track of the episode number but also all the pertinent episode information, and thought a database would be a good solution. I have always wanted to try out the Serverless Postgres offering by neon.tech, so this was a good opportunity to do so. The whole process has been pretty smooth so far.
Choosing an ORM was difficult, I ended up settling for Tortoise ORM because I'd previously played around with it while learning FastAPI. The main reason I liked Tortoise ORM is because it has a syntax similar to the Django ORM, which means a lower learning curve for me, or so I thought ...
Async / Await
... You see, Tortoise ORM is an asyncio ORM, which introduces additional complexities into the mix (See this article by Charles Leifer, and this one by Armin Ronacher). I spent a lot of time fixing async / await issues, and I still don't really know what's going on under the hood! But hey, it works, right?😀 Well, that's a subject for another day!
Summarization
It wasn't hard to get up and running with Langchain, which provides a very nice API to work with LLMs. The resource "5 Levels Of Summarization: Novice to Expert" was very helpful. I went with the simplest approach, as it was sufficient for this project.
I tried playing around with Cohere's Summarize API, but I found it a bit disappointing because of crazy hallucinations where it mixed up content based on old events.
One issue I encountered was exceeding OpenAI's token limit of 4096 tokens. This happened when pricing longer articles. The typical solution for this is to split the content into smaller chunks that fit within the token limit, summarize each chunk, and then get a summary of the summaries. The technical term is referred to as Map - Reduce, and falls under Level 3 in the above resource. However, I didn't bother to go for this technique, because I didn't have the time. So I just wrote a quick and dirty hack, where I truncate the content to fit within the token limit and ignore the rest of the content:
import logging
import math
import textwrap

from langchain import OpenAI, PromptTemplate

from app.core.utilities import OPENAI_API_KEY

llm = OpenAI(temperature=0, openai_api_key=OPENAI_API_KEY)
MAX_TOKENS = 4096


def summarize(content: str, title: str) -> str:
    """Summarize the content using OpenAI's language model."""

    template = """
    Please provide a very short, sweet, informative and engaging summary of the following news entry, in not more than two sentences.
    Please provide your output in a manner suitable for reading as part of a podcast.

    {entry}
    """

    # Calculate the maximum number of tokens available for the prompt
    max_prompt_tokens = MAX_TOKENS - llm.get_num_tokens(template)

    # Trim the content if it exceeds the available tokens
    # TODO: Instead of truncating the content, split it
    # see <https://python.langchain.com/docs/modules/data_connection/document_transformers/text_splitters/split_by_token>
    chars = int(max_prompt_tokens * 3.75)  # Assuming 1 token ≈ 4 chars
    # round down max_chars to the nearest 100
    max_chars = math.floor(chars / 100) * 100
    if len(content) > max_chars:
        content = textwrap.shorten(content, width=max_chars, placeholder=" ...")

    prompt = PromptTemplate(input_variables=["entry"], template=template)

    summary_prompt = prompt.format(entry=content)

    num_tokens = llm.get_num_tokens(summary_prompt)
    logging.info(f"'{title}' and its prompt has {num_tokens} tokens")

    return llm(summary_prompt)
Defining the toolchain and cron job
I'm a big fan of Invoke, which I wrote about in this post. After coding all the bits and pieces, I tied everything together with Invoke. Well, I actually just created a run.py script with a main() function that runs when the run.py script is executed directly. Then I created an Invoke task:
@task
def toolchain(c):
    """The toolchain for creating the podcast"""
    c.run("python app/core/run.py", pty=True)
The idea was to run inv toolchain as part of a cron job script on an Ubuntu VPS. I wrote a cron.sh BASH script and added a bunch of commands there. I made use of healthchecks.io to ensure that I'm aware when the script fails to run. Here's what the script looks like:
#!/usr/bin/env bash

# ==========================================================
# Logical steps
# 1. cd to project directory
# 2. Activate virtual environment
# 3. git pull
# 4. Run script inside docker container (cleanup afterwards)
# 5. commit changes
# 6. push changes to remote
# ==========================================================

set -e  # Exit immediately if any command fails

# 1. cd to project directory
cd "${HOME}/SITES/zed-news" || { echo "Failed to change directory."; exit 1; }

# Source the .env file so we can retrieve healthchecks.io ping URL
# shellcheck source=/dev/null
source .env

# Function to send success signal to healthchecks.io
function send_healthcheck_success() {
  curl -fsS --retry 3 "${HEALTHCHECKS_PING_URL}" > /dev/null
}

# Function to send failure signal to healthchecks.io
function send_healthcheck_failure() {
  curl -fsS --retry 3 "${HEALTHCHECKS_PING_URL}/fail" > /dev/null
}

# 2. Activate virtual environment
# shellcheck source=/dev/null
source "${HOME}/Env/zed-news/bin/activate" || { echo "Failed to activate virtual environment."; send_healthcheck_failure; exit 1; }

# 3. git pull
git pull || { echo "Failed to pull changes from Git."; send_healthcheck_failure; exit 1; }

# 4. Run script inside docker container
inv up --build || { echo "Failed to build Docker container."; send_healthcheck_failure; exit 1; }
docker-compose run --rm app invoke toolchain || { echo "Failed to run script inside Docker container."; send_healthcheck_failure; exit 1; }
inv down || { echo "Failed to stop Docker container."; send_healthcheck_failure; exit 1; }

# 5. commit changes
today_iso=$(date --iso)
git add . || { echo "Failed to stage changes for commit."; send_healthcheck_failure; exit 1; }
git commit --no-verify -m "chore: ✨ new episode 🎙️ » ${today_iso}" || { echo "Failed to commit changes."; send_healthcheck_failure; exit 1; }

# 6. push changes to remote
git push origin main || { echo "Failed to push changes to remote repository."; send_healthcheck_failure; exit 1; }

# Send success signal to healthchecks.io
send_healthcheck_success

# Pause for 5 minutes
sleep 300

# Notify Admin via Telegram
# See next section ...
Pushing the changes to remote triggers a Cloudflare Pages build & deployment. I pause the script for 5 minutes to allow this process to complete, before notifying myself.
Notifying myself when a new episode is published
As I have already mentioned, this project was really a fantastic learning opportunity for me. I learned how to use apprise, by configuring it to send myself a message via Telegram when a new episode was published. This is the last step in the cron.sh script:
# Notify Admin via Telegram
today_human_readable=$(date +"%a %d %b %Y")
apprise -vv -t "🎙️ New Episode » ${today_human_readable}" \
  -b "📻 Listen now at ${BASE_URL}/episode/${today_iso}/" \
  tgram://"${TELEGRAM_BOT_TOKEN}"
Switching from pip-tools to poetry
I have been using pip-tools in my projects for a while, I even wrote about it here. However, I use Poetry a lot at work, and have come to love it! Initially, I just wanted to update my pip-tools setup to use pyproject.toml to manage dependencies, instead of multiple requirements* files. However, I ended up convincing myself to just switch to Poetry, which I did, and it was fun porting from pip-tools!
Switching from flake8 / isort/ pycodestyle to ruff
Having heard about ruff, I decided to give it a try on this project. One of the motivations for this was that I would have fewer config files in my project root since ruff uses pyproject.toml! Also, it's one linting command instead of several! The switch was fairly smooth, I didn't encounter any issues that I can immediately recall. My Invoke linting task looks like this:
@task(help={"fix": "let black and ruff format your files"})
def lint(c, fix=False):
    """ruff and black"""

    if fix:
        c.run("black .", pty=True)
        c.run("ruff check --fix .", pty=True)
    else:
        c.run("black . --check", pty=True)
        c.run("ruff check .", pty=True)
And the GitHub Actions job looks like this
jobs:
  linter_ruff:
    runs-on: ubuntu-22.04
    container: python:3.10-slim-bullseye

    steps:
      - name: Checkout Code Repository
        uses: actions/checkout@v3

      - name: Install Dependencies
        run: |
          pip install -q ruff==0.0.270
      - name: ruff
        run: |
          ruff check --format=github .
Audio mixing on auto-pilot
In December 2022, I wrote about using CLI tools to manage audio, video, images and PDF files. One of these tools is FFmpeg, and it came in quite handy in this project because I had to automate various aspects of the audio production, as follows:
Adjustment of the AWS Polly generated audio file's sample rate from 24 kHz to 44.1 kHz. This is the standard for most consumer audio and is used for formats like CDs.
Converting the result from (1) above from mono to 128 kb/s stereo.
Adjustment of the treble (high frequency).
Addition of both an intro and outro instrumental.
Addition of ID3 tags to the final audio file
I wrote a function to do these things:
# For more details, see
# https://github.com/engineervix/zed-news/blob/v0.3.1/app/core/podcast/mix.py

async def mix_audio(voice_track, intro_track, outro_track, dest=f"{DATA_DIR}/{today_iso_fmt}_podcast_dist.mp3"):
    """
    Mix the voice track, intro track, and outro track into a single audio file
    """

    voice_track_file_name = os.path.splitext(voice_track)[0]
    mix_44100 = f"{voice_track_file_name}.44.1kHz.mp3"
    voice_track_in_stereo = f"{voice_track_file_name}.stereo.mp3"
    eq_mix = f"{voice_track_file_name}.eq-mix.mp3"
    initial_mix = f"{voice_track_file_name}.mix-01.mp3"

    # change the voice track sample rate to 44.1 kHz
    subprocess.run(
        f"ffmpeg -i {voice_track} -ar 44100 {mix_44100}",
        shell=True,
    )

    # convert voice track from mono to 128 kb/s stereo
    subprocess.run(
        f'ffmpeg -i {mix_44100} -af "pan=stereo|c0=c0|c1=c0" -b:a 128k {voice_track_in_stereo}',
        shell=True,
    )

    # adjust the treble (high-frequency).
    # The g=3 parameter specifies the gain in decibels (dB) to be applied to the treble frequencies.
    subprocess.run(
        f'ffmpeg -i {voice_track_in_stereo} -af "treble=g=3" {eq_mix}',
        shell=True,
    )

    # initial mix: the intro + voice track
    subprocess.run(
        f'ffmpeg -i {eq_mix} -i {intro_track} -filter_complex amix=inputs=2:duration=longest:dropout_transition=0:weights="1 0.25":normalize=0 {initial_mix}',
        shell=True,
    )

    # get duration of the initial mix
    command_1 = f'ffmpeg -i {initial_mix} 2>&1 | grep "Duration"'
    output_1 = run_ffmpeg_command(command_1)
    duration_1 = extract_duration_in_milliseconds(output_1)

    # get duration of the outro instrumental
    command_2 = f'ffmpeg -i {outro_track} 2>&1 | grep "Duration"'
    output_2 = run_ffmpeg_command(command_2)
    duration_2 = extract_duration_in_milliseconds(output_2)

    # pad the outro instrumental with silence, using initial mix duration and
    # the outro instrumental's duration
    # adelay = (duration of initial mix - outro instrumental duration) in milliseconds
    if duration_1 != 0 and duration_2 != 0:
        padded_outro = f"{voice_track_file_name}.mix-02.mp3"

        adelay = duration_1 - duration_2
        subprocess.run(f'ffmpeg -i {outro_track} -af "adelay={adelay}|{adelay}" {padded_outro}', shell=True)

        # final mix: the initial mix + the padded outro
        subprocess.run(
            f'ffmpeg -i {initial_mix} -i {padded_outro} -filter_complex amix=inputs=2:duration=longest:dropout_transition=0:weights="1 0.25":normalize=0 {dest}',
            shell=True,
        )

        # add Id3 tags
        episode = await get_episode_number()
        audio_file = dest
        tag = eyed3.load(audio_file).tag
        tag.artist = "Victor Miti"
        tag.album = "Zed News"
        tag.title = f"Zed News Podcast, Episode {episode:03} ({today_human_readable})"
        tag.track_num = episode
        tag.release_date = eyed3.core.Date(today.year, today.month, today.day)
        tag.genre = "Podcast"
        album_art_file = f"{IMAGE_DIR}/album-art.jpg"
        with open(album_art_file, "rb") as cover_art:
            # The value 3 indicates that the front cover shall be set
            # # https://eyed3.readthedocs.io/en/latest/eyed3.id3.html#eyed3.id3.frames.ImageFrame
            tag.images.set(3, cover_art.read(), "image/jpeg")
        tag.save()

        # Clean up
        for f in [voice_track_in_stereo, mix_44100, eq_mix, initial_mix, padded_outro]:
            delete_file(f)
The RSS Feed
People typically use podcast management tools such as SimpleCast, Buszzsprout, Podbean, etc. These manage various aspects of the podcast publishing process, including file hosting, and submission to Google Podcasts, Apple Podcasts and all the other major podcast platforms. In my case, I was essentially rolling out my own solution, which meant that I had to deal with all these tasks myself. I had already sorted out the file hosting by using AWS S3. The main thing I needed to do next was automatic submission of my podcast to various platforms. It turns out that the key to doing this properly is having a well-structured RSS Feed with the right metadata. I found the following resources to be very helpful:
A Podcaster's Guide to RSS, by Apple
RSS feed guidelines for Google Podcasts, by Google
Getting this part of the project right involved a bit of trial and error, this is the Nunjucks template I ended up with for generating the feed.xml file:
---json
{
"permalink": "feed.xml",
"eleventyExcludeFromCollections": true,
"metadata": {
"title": "Zed News Podcast",
"description": "Your weekday source for the latest happenings in Zambia (and beyond), the Zed News Podcast is an automated news podcast consisting of AI-powered updates from various Zambian sources. New episodes Monday to Friday between 16:45 and 17:00 CAT.",
"url": "https://example.com",
"feedUrl": "https://example.com/feed.xml",
"author": {
"name": "Victor Miti",
"email": "victormiti@gmail.com"
}
}
}
---
<?xml version="1.0" encoding="UTF-8"?>
<rss version="2.0"
xmlns:itunes="http://www.itunes.com/dtds/podcast-1.0.dtd"
xmlns:content="http://purl.org/rss/1.0/modules/content/">
<channel>
<title>{{ metadata.title }}</title>
<description>{{ metadata.description }}</description>
<itunes:owner>
<itunes:name>{{ metadata.author.name }}</itunes:name>
<itunes:email>{{ metadata.author.email }}</itunes:email>
</itunes:owner>
<itunes:author>{{ metadata.author.name }}</itunes:author>
<itunes:image href="{{ site.base_url }}/img/zed-news-podcast-album-art.jpg"/>
<itunes:category text="News & Politics" />
<itunes:explicit>no</itunes:explicit>
<language>en</language>
<link href="{{ site.base_url }}" rel="self"/>
<link href="{{ site.base_url }}"/>
{%- for episode in collections.episode | reverse -%}
{% set absolutePostUrl %}{{ episode.url | url | absoluteUrl(site.base_url) }}{% endset %}
<item>
<title>{{ episode.data.title }}</title>
<description>{{ episode.data.description }} It is presented by {{ episode.data.presenter }} in {{ episode.data.locale.name }} and consists of {{ episode.data.references.count }} articles from {{ episode.data.references.sources }} sources. The size of the audio file is {{ episode.data.mp3.size }}. Running time is {{ episode.data.mp3.length }}.Check out the <![CDATA[ <a href="{{ absolutePostUrl }}">episode notes</a> ]]> for more information, including links to the news sources.</description>
<pubDate>{{ episode.date | dateToRfc822 }}</pubDate>
<enclosure url="{{ episode.data.mp3.url }}"
type="audio/mpeg" length="{{ episode.data.rss.enclosure_length }}"/>
<itunes:duration>{{ episode.data.rss.itunes_duration }}</itunes:duration>
<link>{{ absolutePostUrl }}</link>
<guid>{{ absolutePostUrl }}</guid>
<itunes:explicit>no</itunes:explicit>
</item>
{%- endfor %}
</channel>
</rss>
With this in place, I just submitted https://zednews.pages.dev/feed.xml to the relevant platforms and that was it.
Rendering a different button depending on OS
I wanted to show a "Listen on Apple Podcasts" button when the site was accessed from an Apple device, and "Listen on Google Podcasts" for all other devices. I used UAParser.js to achieve this:
function generatePodcastListenButton() {
  const parser = new UAParser();
  const result = parser.getResult();

  const platform = result.os.name.toLowerCase();
  let buttonHTML = "";

  if (platform === "mac os" || platform === "ios") {
    buttonHTML = `
      <a class="podcast-listen-btn" href="https://podcasts.apple.com/us/podcast/zed-news-podcast/id1690709989">
        <img src="/img/apple-podcasts-badge.svg" alt="Listen on Apple Podcasts" height="40" />
      </a>
    `;
  } else {
    buttonHTML = `
      <a class="podcast-listen-btn" href="https://podcasts.google.com/feed/aHR0cHM6Ly96ZWRuZXdzLnBhZ2VzLmRldi9mZWVkLnhtbA">
        <img src="/img/google-podcasts-badge.svg" alt="Listen on Google Podcasts" height="38" />
      </a>
    `;
  }

  return buttonHTML;
}
Writing unit tests without using pytest
I am used to writing tests using pytest. However, I decided to challenge myself to improve my knowledge and understanding of unittest, which is part of the standard library. I recently came to know about the left-pad chaos, and was challenged by this thought-provoking article. I already have too many dependencies on this project, and I didn't want to install more stuff and start configuring pytest, when I could achieve the same thing with unittest and even learn one thing or two in the process. I did spend quite some time writing tests, and I must say I enjoyed the process and gained valuable knowledge and experience, particularly regarding mocking.
Cloudflare Pages Issues
I use Cloudflare for my DNS setups. I prefer Cloudflare Pages for deploying static sites because it is part of the Cloudflare suite of tools, which makes it easy for me to manage everything in one place. However, at the time of deploying the project, Cloudflare Pages' v1 build system (stable) supported old versions of various software. For example, the default Python version is 2.7, and only Python versions 2.7, 3.5 and 3.7 were supported. I didn't think this would affect me, because the build command for the generated static site did not need Python at all. However, I was wrong! The build system looks for certain files in the project root and makes assumptions based on those files. In my case, it "knew" this was a Python project and therefore attempted to install the project dependencies. This failed because the project uses Python 3.10.
I therefore had to change the build settings to use the v2 build system (beta). The build process still failed, because it couldn't install dependencies using poetry! So I had to generate a requirements.txt file from poetry:
poetry export --with dev --without-hashes --format requirements.txt --output requirements.txt
The other issue, which I actually encountered on a different project, had to do with the Node version. I experienced build failures using Node.js v18. I only fixed the problem by downgrading to v16. With this in mind, I maintained the project's Node.js version to v16, as I wasn't prepared to experiment with v18 again. Perhaps this may have been fixed by now, I'll need to check at some point.
The result
Well, here it is ...
On Mobile

On Desktop
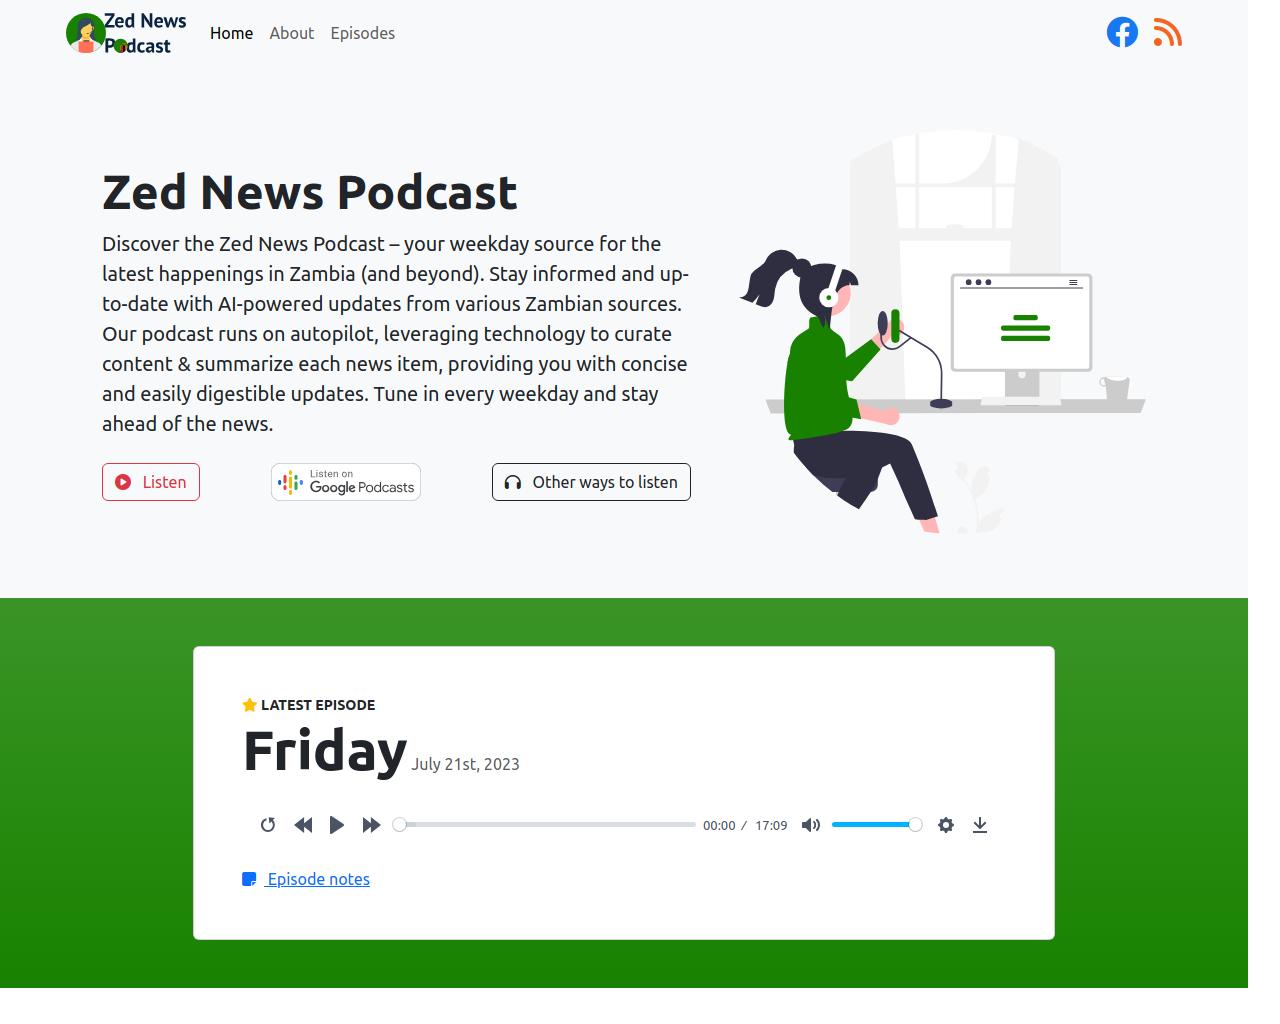
It's not perfect, but it works! Check it out and let me know what you think. The code is open, feel free to add your contributions to make it better!
Cover image generated by Bing.