Conditional Display of Fields in Wagtail Admin
Building, breaking and fixing things. Learning something new everyday.
There may be times when you need to conditionally hide or show some fields in the Wagtail Page Editor. This post illustrates one approach to achieve this, using JavaScript.
Suppose we have a toys app and a ToyPage model with fields defined as shown below:
class ToyPage(Page):
    description = RichTextField(features=["bold", "italic", "link"])
    designer = models.ForeignKey(
        User, on_delete=models.SET_NULL, null=True, blank=True, related_name="toys"
    )
    use_designer_email = models.BooleanField(
        default=False,
        verbose_name="Use designer's email",
        help_text="Use the designer's email address as the contact email",
    )
    contact_email = models.EmailField(blank=True)
We want to show the contact_email field by default, and hide it when use_designer_email is True.
We can do this via JavaScript, by registering an event listener on the use_designer_email checkbox, and toggling the display of the use_designer_email FieldPanel.
Wagtail provides the insert_editor_js hook, which facilitates addition of extra JavaScript files or code snippets to the page editor. In our app's wagtail_hooks.py, we register a function with the above hook:
# /path/to/project/toys/wagtail_hooks.py
from django.templatetags.static import static
from django.utils.html import format_html
from wagtail import hooks


@hooks.register("insert_editor_js")
def editor_js():
    return format_html('<script src="{}"></script>', static("js/page-editor.js"))
We could write the JavaScript code directly in the editor_js function above, but for ease of maintenance I think it's better to just write the JavaScript code in its own file, which, in this case, is js/page-editor.js within the STATICFILES_DIRS. Now, before we write the JavaScript code, we need to use our web browser's developer tools to inspect the DOM so we understand the panel layout and get the correct selectors for the elements we'll be working with.
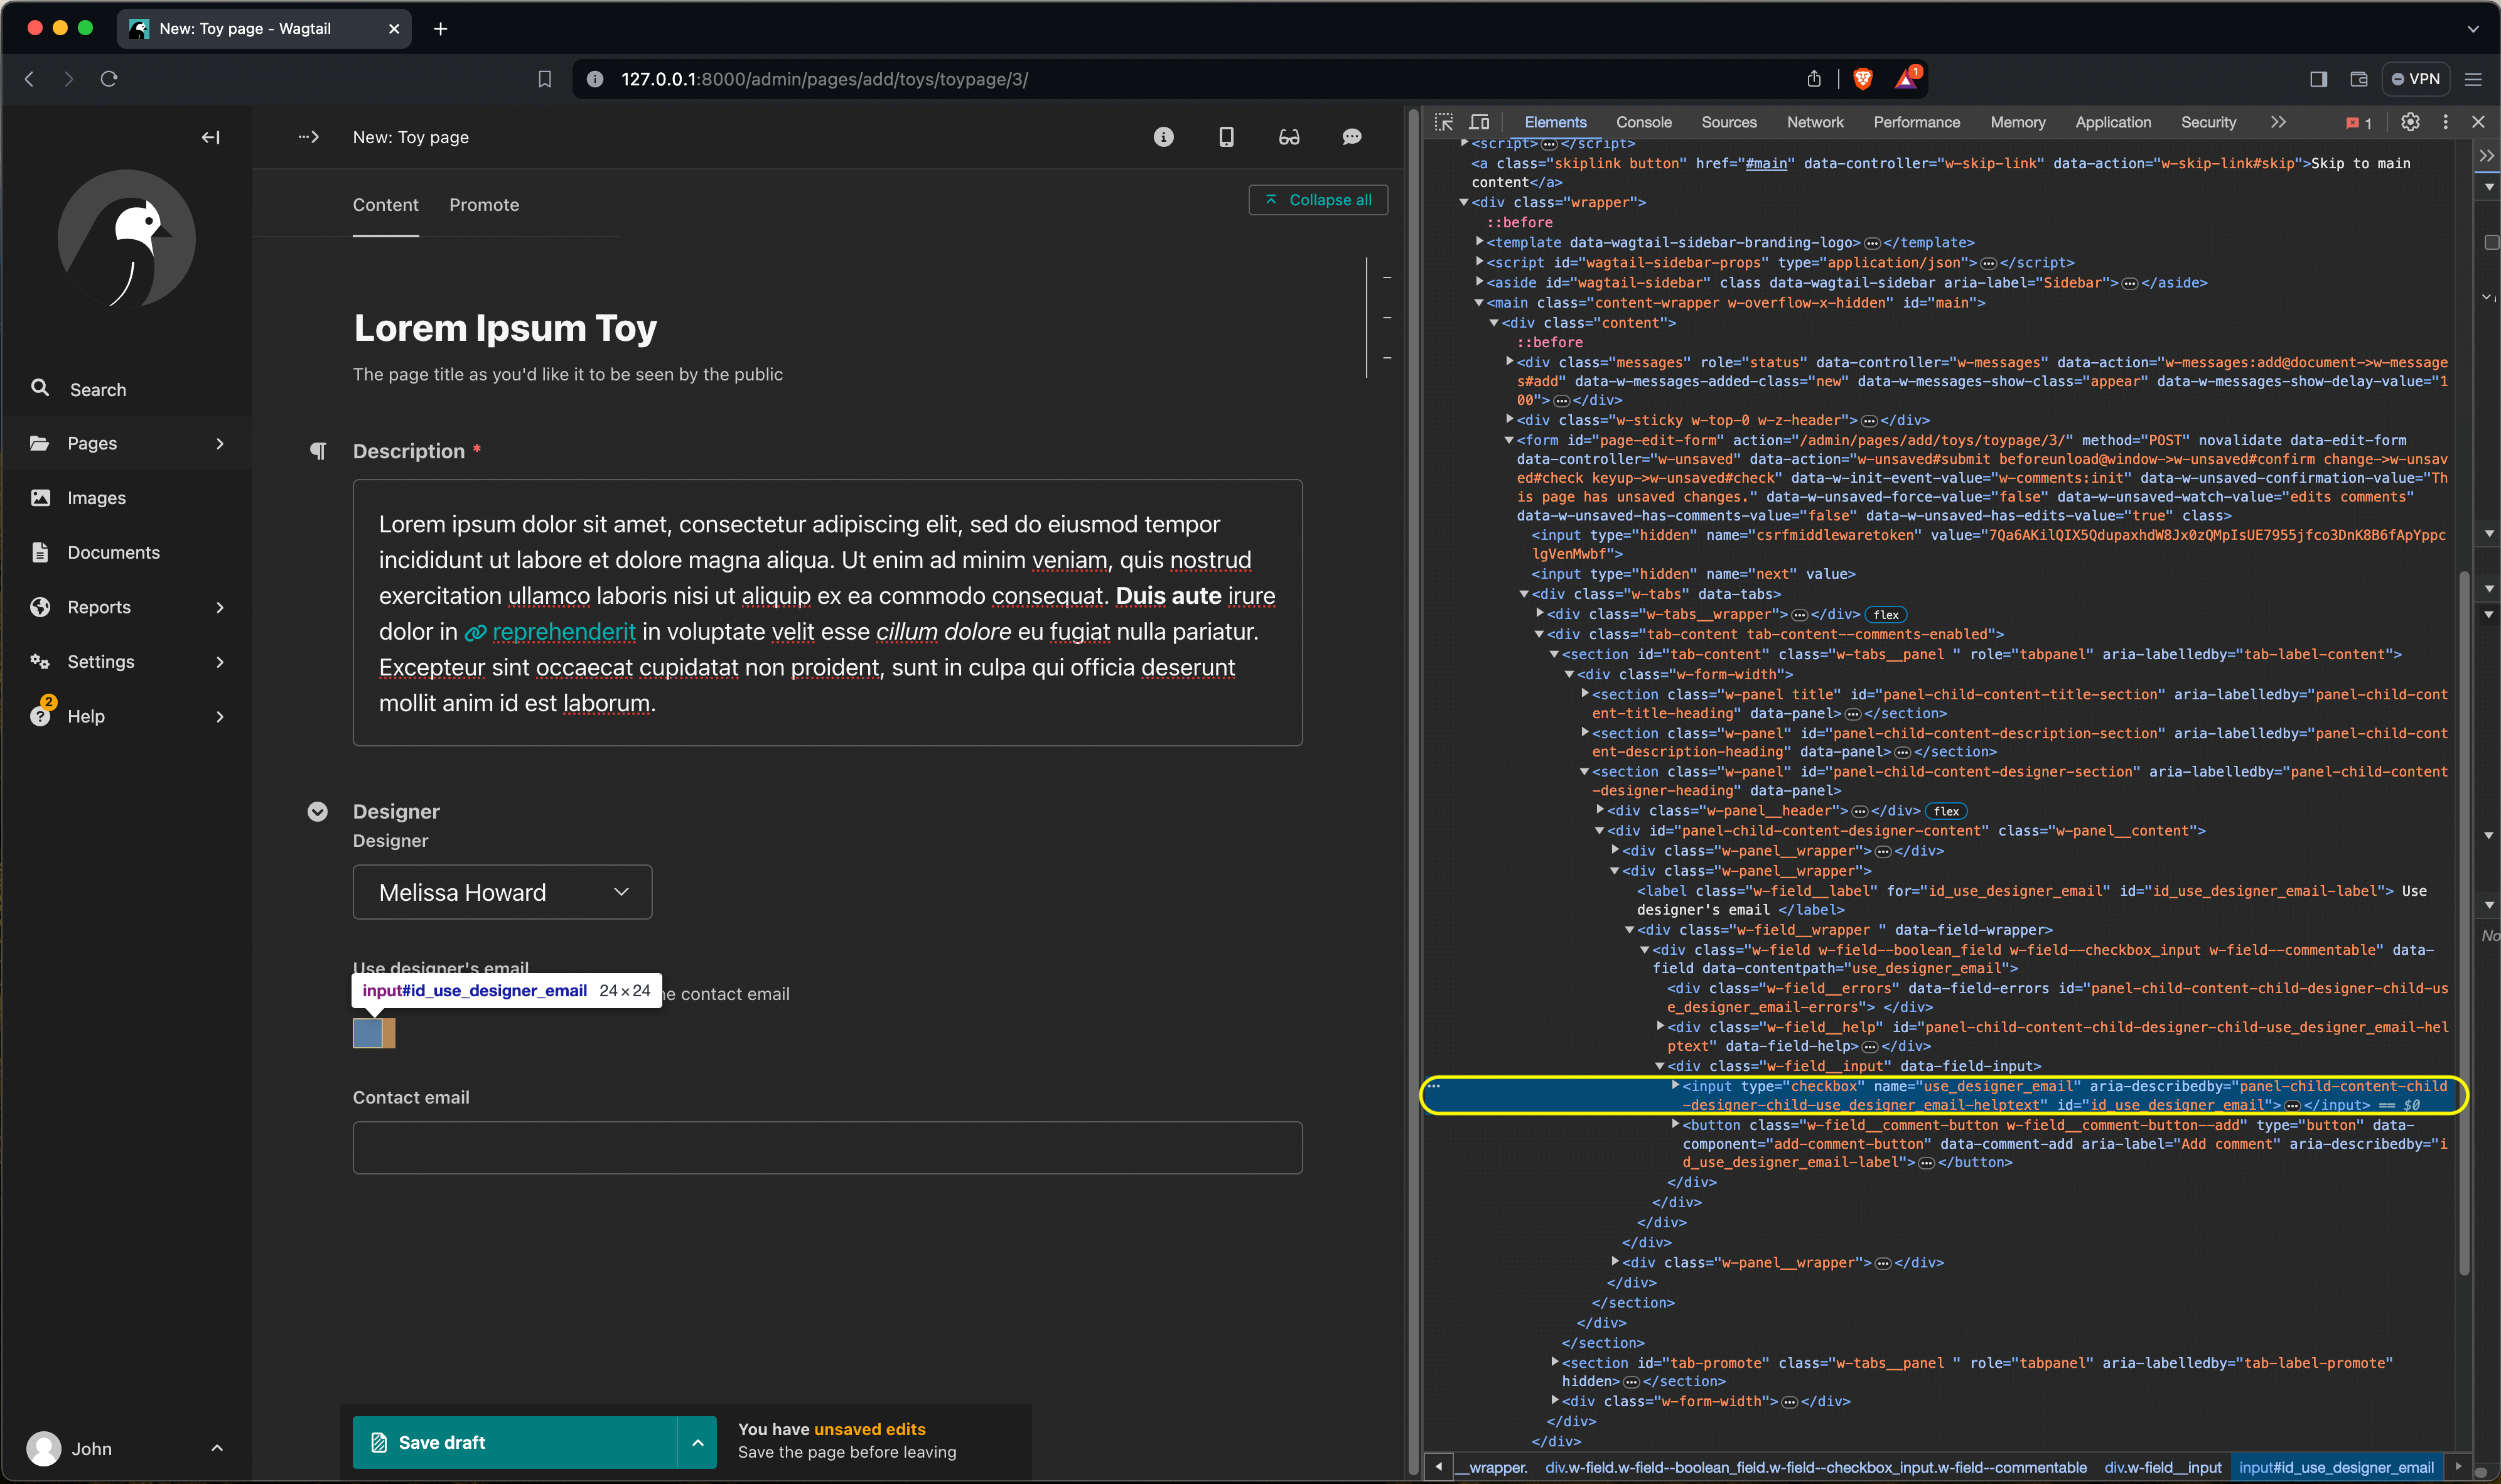
In the screenshot above, the element representing the use_designer_email BooleanField is highlighted. In this case, it's a checkbox input:
<input
  type="checkbox"
  name="use_designer_email"
  id="id_use_designer_email"
  aria-describedby="panel-child-content-child-designer-child-use_designer_email-helptext"
/>
And now, let's take a closer look at the contact_email:
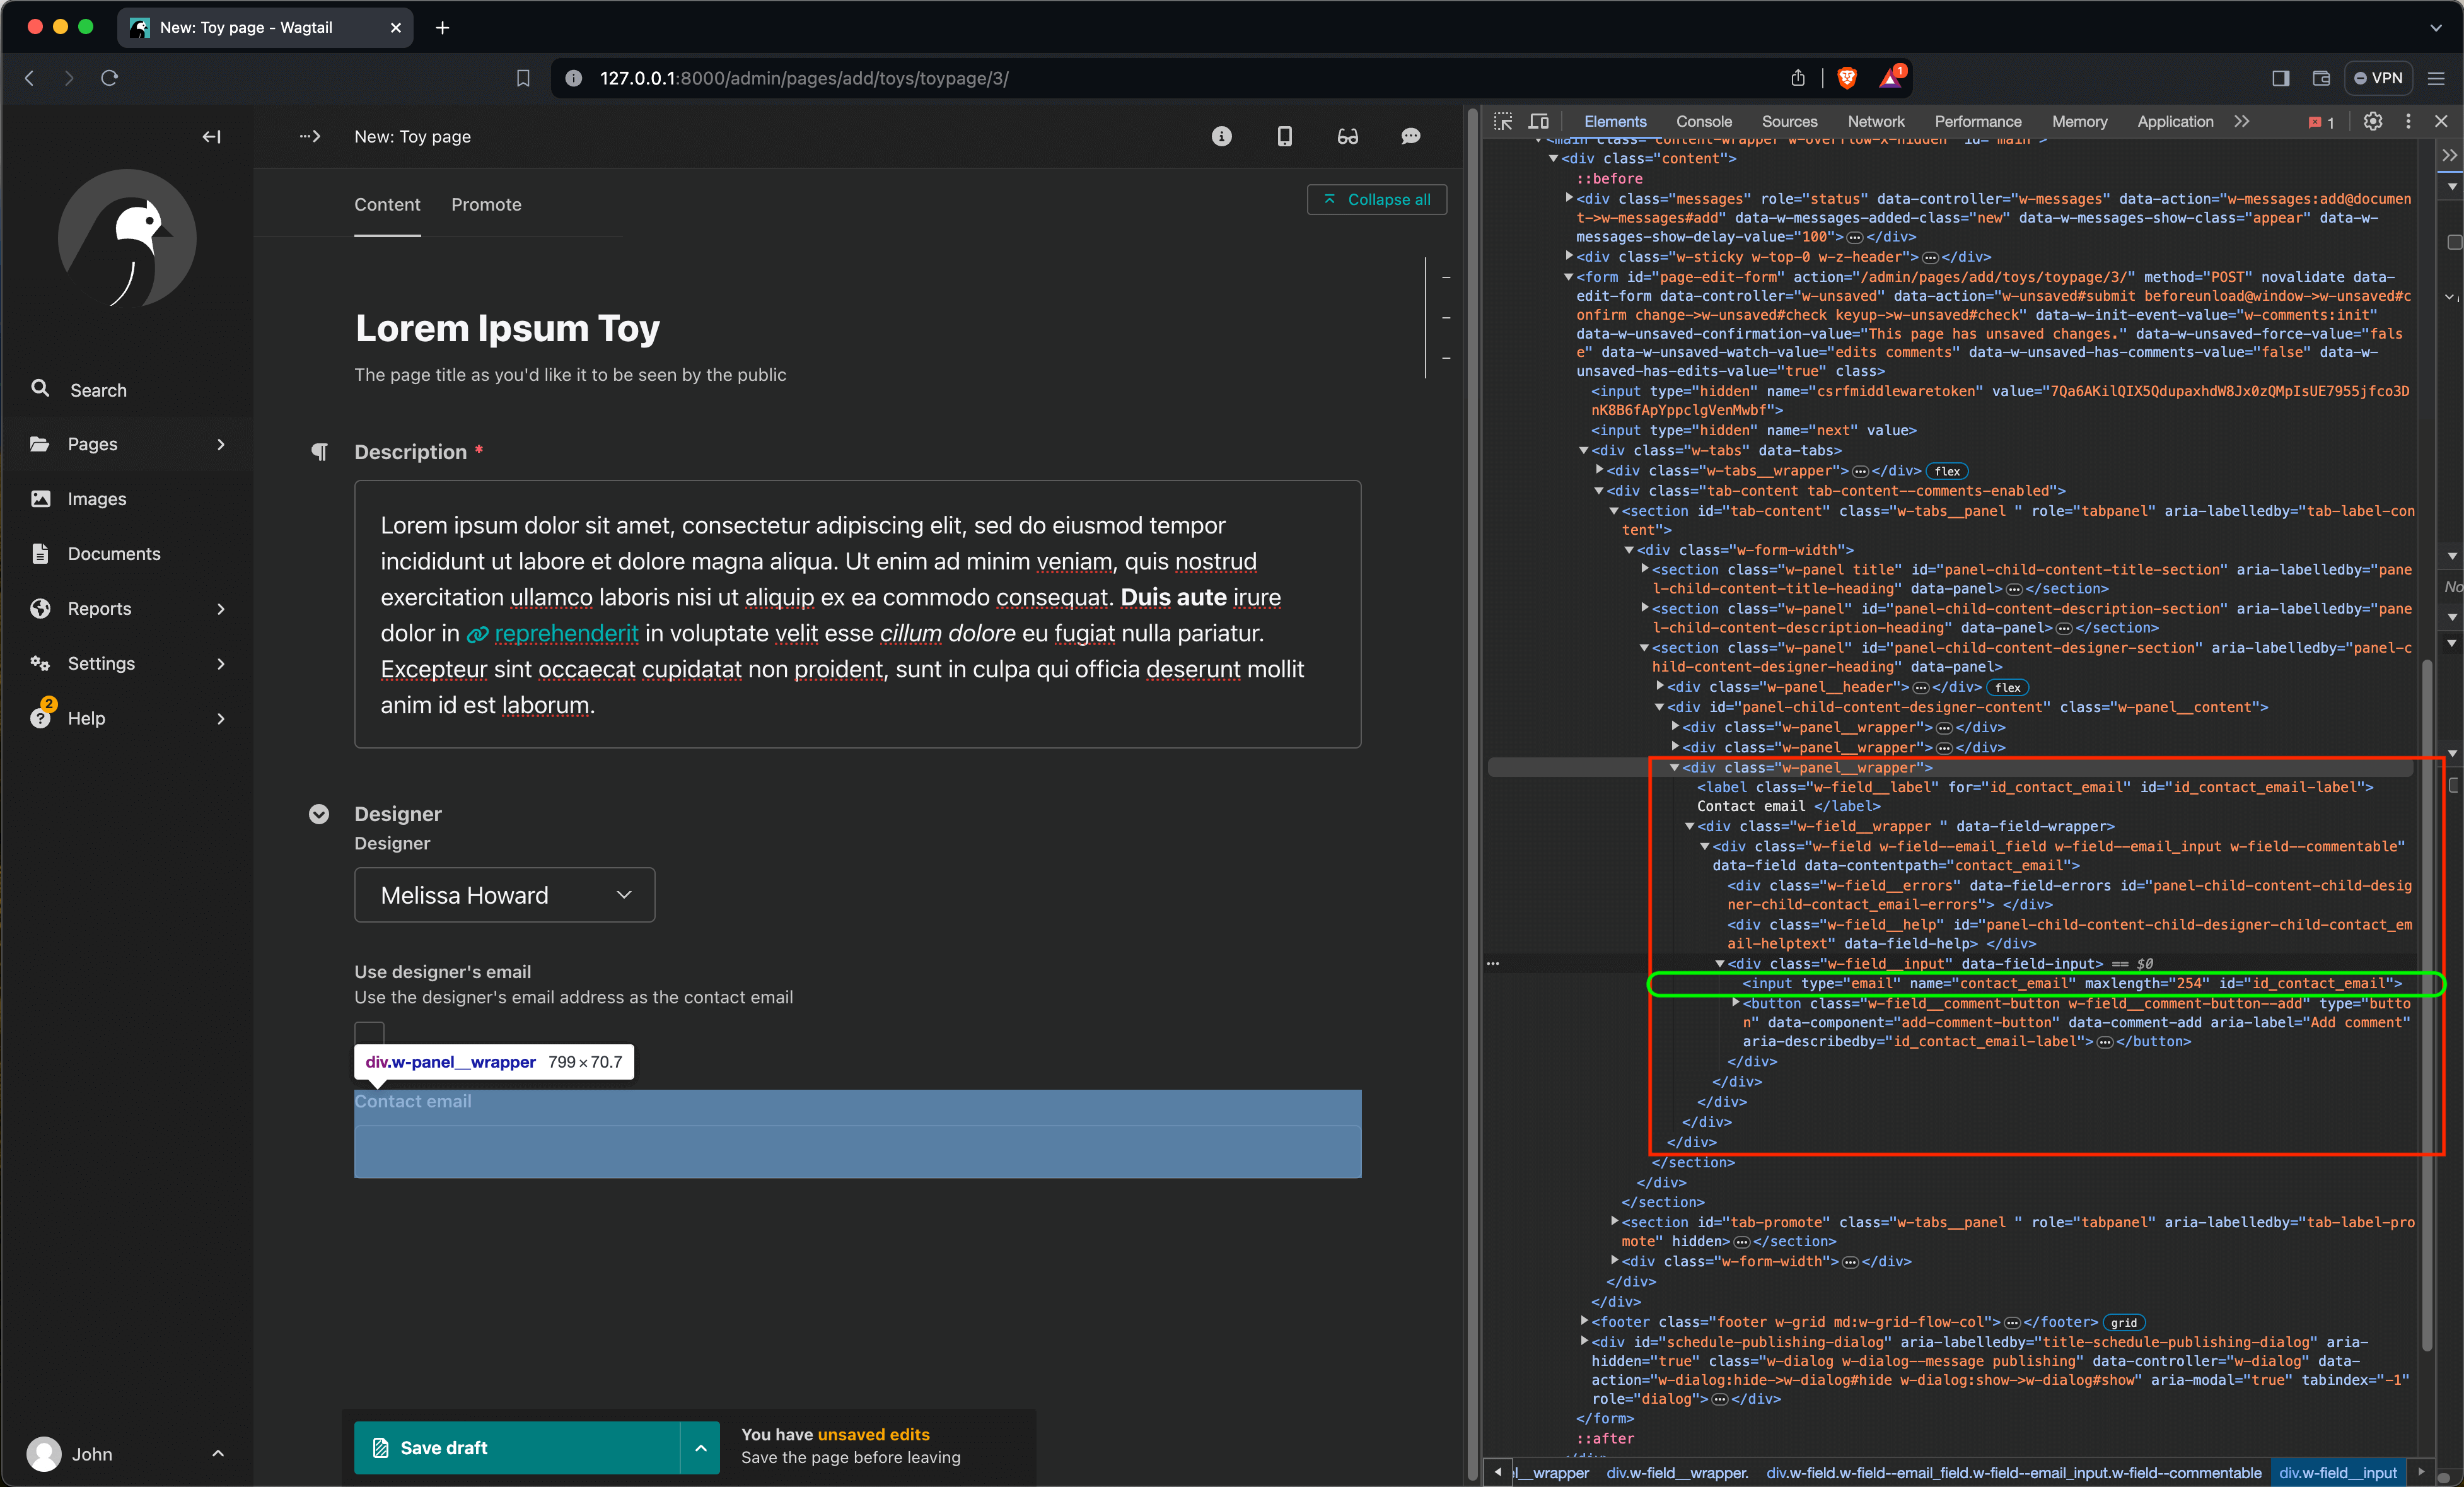
The green rectangle represents the email input, while the red rectangle represents the containing div (with class w-panel__wrapper) which we actually want to hide/show — we don't want to hide just the input, but also the label and everything else associated with it. Here's the markup, for reference:
<div class="w-panel__wrapper">
  <label
    class="w-field__label"
    for="id_contact_email"
    id="id_contact_email-label"
  >
    Contact email
  </label>

  <div class="w-field__wrapper" data-field-wrapper="">
    <div
      class="w-field w-field--email_field w-field--email_input w-field--commentable"
      data-field=""
      data-contentpath="contact_email"
    >
      <div
        class="w-field__errors"
        data-field-errors=""
        id="panel-child-content-child-designer-child-contact_email-errors"
      ></div>

      <div
        class="w-field__help"
        id="panel-child-content-child-designer-child-contact_email-helptext"
        data-field-help=""
      ></div>

      <div class="w-field__input" data-field-input="">
        <input
          type="email"
          name="contact_email"
          maxlength="254"
          id="id_contact_email"
        />

        <button
          class="w-field__comment-button w-field__comment-button--add"
          type="button"
          data-component="add-comment-button"
          data-comment-add=""
          aria-label="Add comment"
          aria-describedby="id_contact_email-label"
        >
          <svg class="icon icon-comment-add icon" aria-hidden="true">
            <use href="#icon-comment-add"></use>
          </svg>
          <svg class="icon icon-comment-add-reversed icon" aria-hidden="true">
            <use href="#icon-comment-add-reversed"></use>
          </svg>
        </button>
      </div>
    </div>
  </div>
</div>
With this information, we can now go ahead and write our code:
document.addEventListener("DOMContentLoaded", function () {
  const checkbox = document.querySelector(
    'input[type="checkbox"][name="use_designer_email"][id="id_use_designer_email"]'
  );
  const emailField = document.querySelector(
    'input[type="email"][name="contact_email"][id="id_contact_email"]'
  );

  function toggleEmailField() {
    const panelWrapper = emailField.closest(".w-panel__wrapper");
    panelWrapper.style.display = checkbox.checked ? "none" : "block";
  }

  function initializePage() {
    checkbox.addEventListener("change", toggleEmailField);
  }

  initializePage();
});
A few things to note here:
Adding an event listener for the
DOMContentLoadedevent ensures that the code inside this function runs only when the DOM content is fully loaded and parsed.The
closest()method is applied on theemailFieldin order to find the closest ancestor element with the class"w-panel__wrapper"relative to theemailField. This is particularly important, because, as you may have noticed from the screenshots above, there are severaldivs with class"w-panel__wrapper", so we need to ensure that we are hiding/showing the correct one!We dynamically toggle the visibility of the
panelWrapperby adjusting it'sstyleproperty to control thedisplayCSS property. This involves switching between'display: none;'and'display: block;'based on the checked state of the checkbox.We listen for the
changeevent on the checkbox to trigger thetoggleEmailFieldfunction when the checkbox state changes.
Here's what this looks like:
Pretty cool, right? Well, let's look at one more contrived example.
Now, going back to our ToyPage model, suppose we have an inline model on our ToyPage, and we want to control visibility of a field within the inline model. Here's the ToyCampaign inline model, and the updated ToyPage model:
class ToyCampaign(Orderable):
    page = ParentalKey("ToyPage", related_name="campaigns")

    title = models.CharField(max_length=255)

    start_date = models.DateTimeField()
    end_date_is_known = models.BooleanField(default=False)
    end_date = models.DateTimeField(blank=True, null=True)

    panels = [
        FieldPanel("title"),
        MultiFieldPanel(
            [
                FieldPanel("start_date"),
                FieldPanel("end_date_is_known"),
                FieldPanel("end_date"),
            ],
            heading="Dates",
        ),
    ]

    def clean(self):
        errors = defaultdict(list)
        super().clean()

        end_date = self.end_date

        if self.end_date_is_known and not end_date:
            errors["end_date"].append(
                _("Please specify the end date, since it is known!")
            )

        if end_date and end_date <= self.start_date:
            errors["end_date"].append(_("End date must be after start date"))

        if errors:
            raise ValidationError(errors)

    def __str__(self):
        return "Toy Campaign ‘{}’ on Page “{}”".format(self.title, self.page.title)


class ToyPage(Page):
    description = RichTextField(features=["bold", "italic", "link"])
    designer = models.ForeignKey(
        User, on_delete=models.SET_NULL, null=True, blank=True, related_name="toys"
    )
    use_designer_email = models.BooleanField(
        default=False,
        verbose_name="Use designer's email",
        help_text="Use the designer's email address as the contact email",
    )
    contact_email = models.EmailField(blank=True)

    content_panels = Page.content_panels + [
        FieldPanel("description"),
        MultiFieldPanel(
            [
                FieldPanel("designer"),
                FieldPanel("use_designer_email"),
                FieldPanel("contact_email"),
            ],
            heading="Designer",
        ),
        InlinePanel("campaigns", heading="Campaigns", label="Campaign"),
    ]

    search_fields = Page.search_fields + [
        index.SearchField("description"),
        index.FilterField("designer"),
        index.FilterField("use_designer_email"),
    ]

    @cached_property
    def email(self):
        if (designer := self.designer) and self.use_designer_email:
            return designer.email
        return self.contact_email
Here's what this looks like (Most of the panels have been deliberately collapsed in order to fit everything in one view, for the sake of this illustration) :
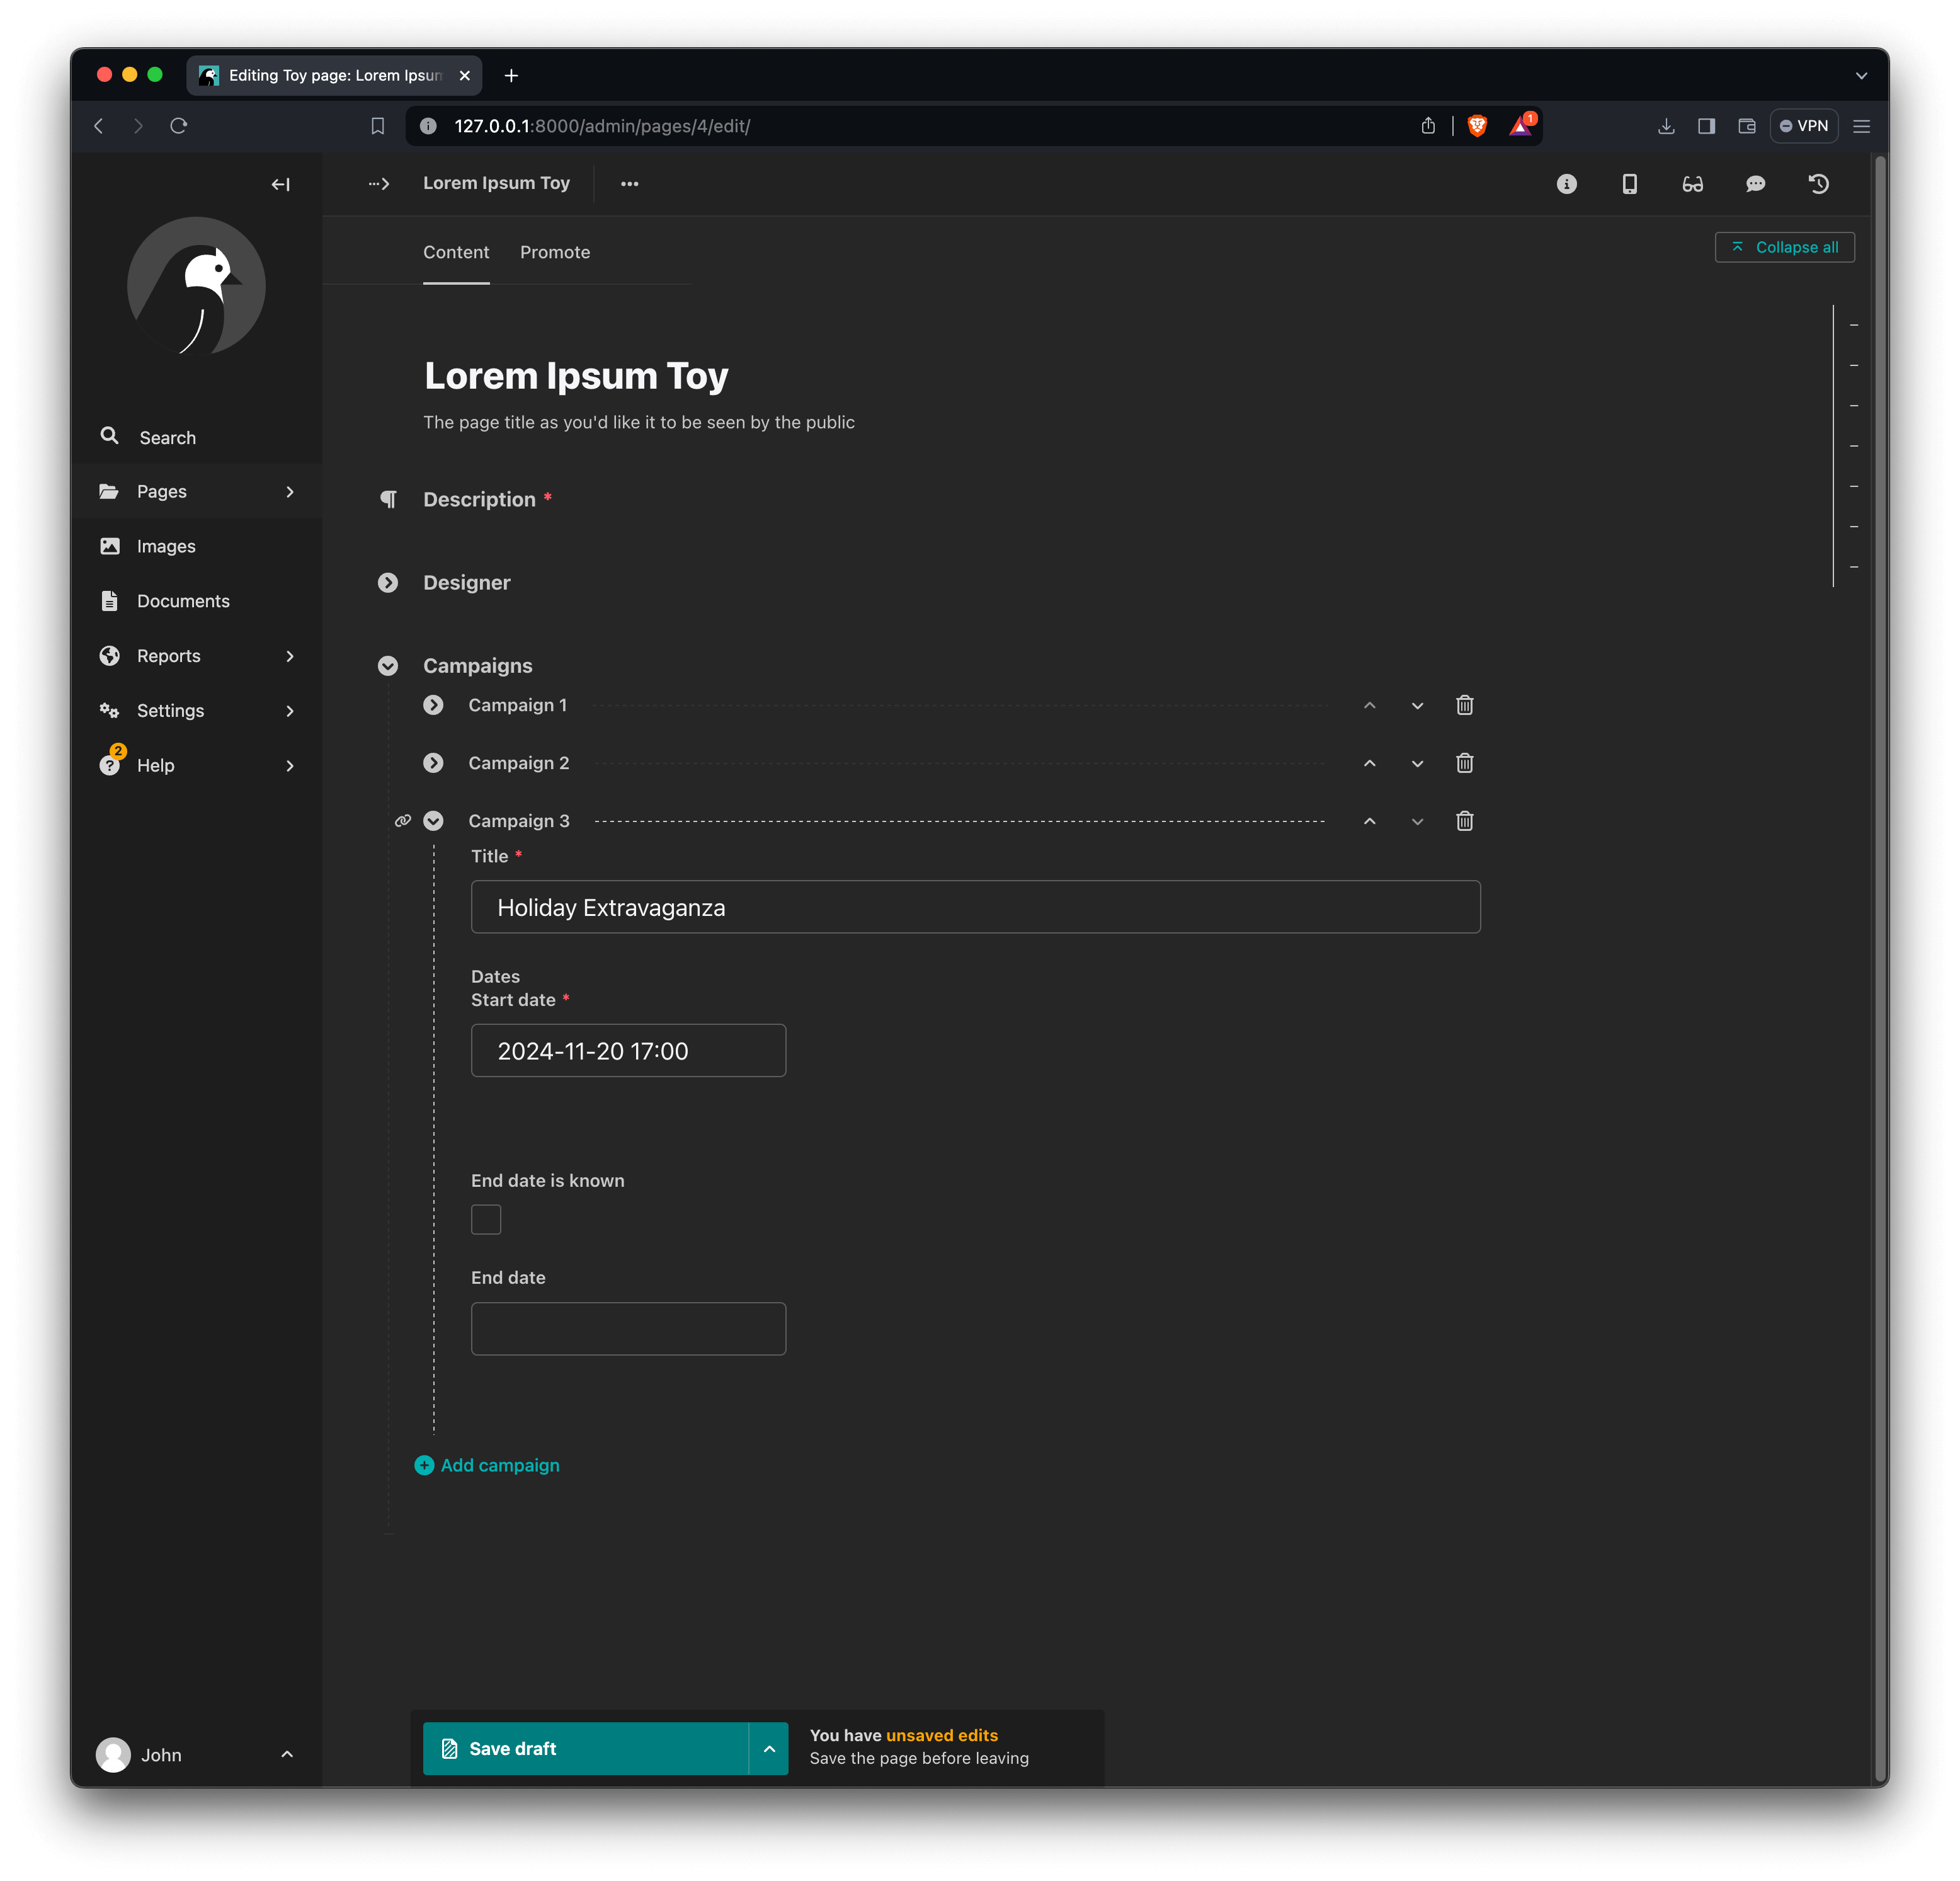
Now, here, we want to hide the End date by default, and only display it when the End date is known checkbox is ticked. Generally the same approach we used earlier applies even here. However, we are now dealing with InlinePanels, which introduces some challenges:
We have no control over the number of campaigns, which means we have to be very careful about how we select the elements to work with.
When the page editor is loaded, there may be no campaigns at all, and additional campaigns can be added at any point.
Once again, the developer tools' DOM inspector is our friend here:
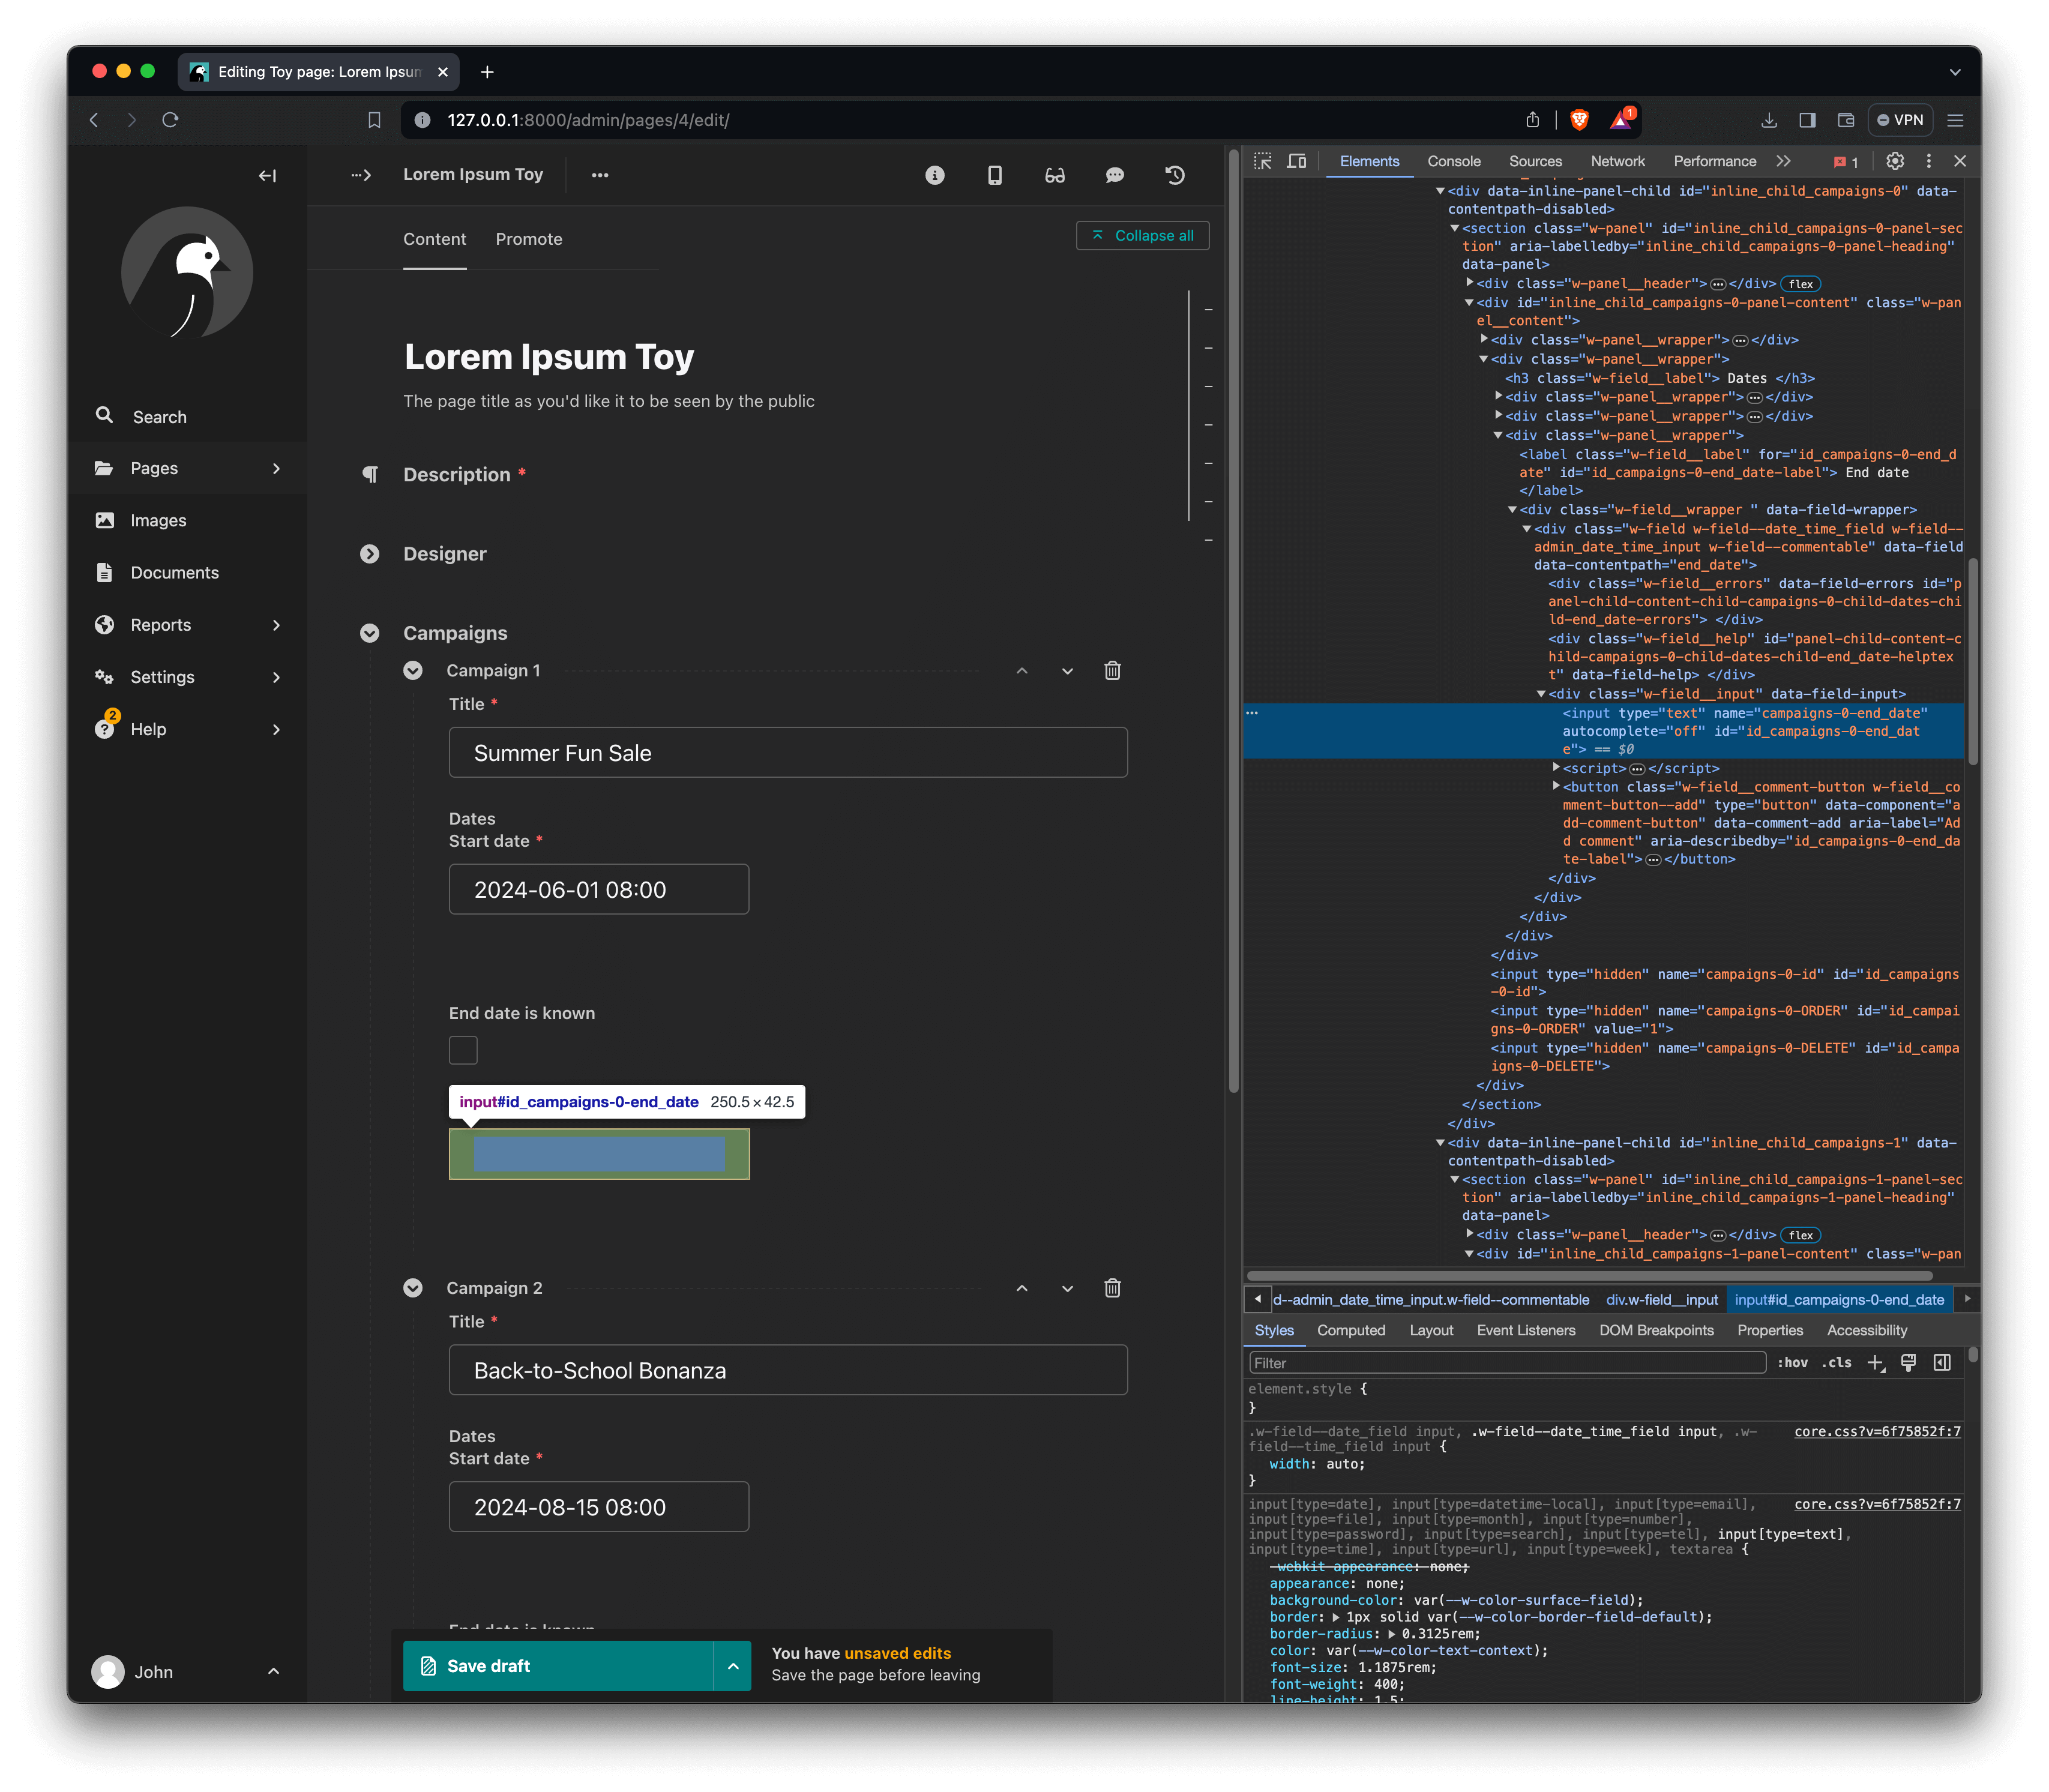
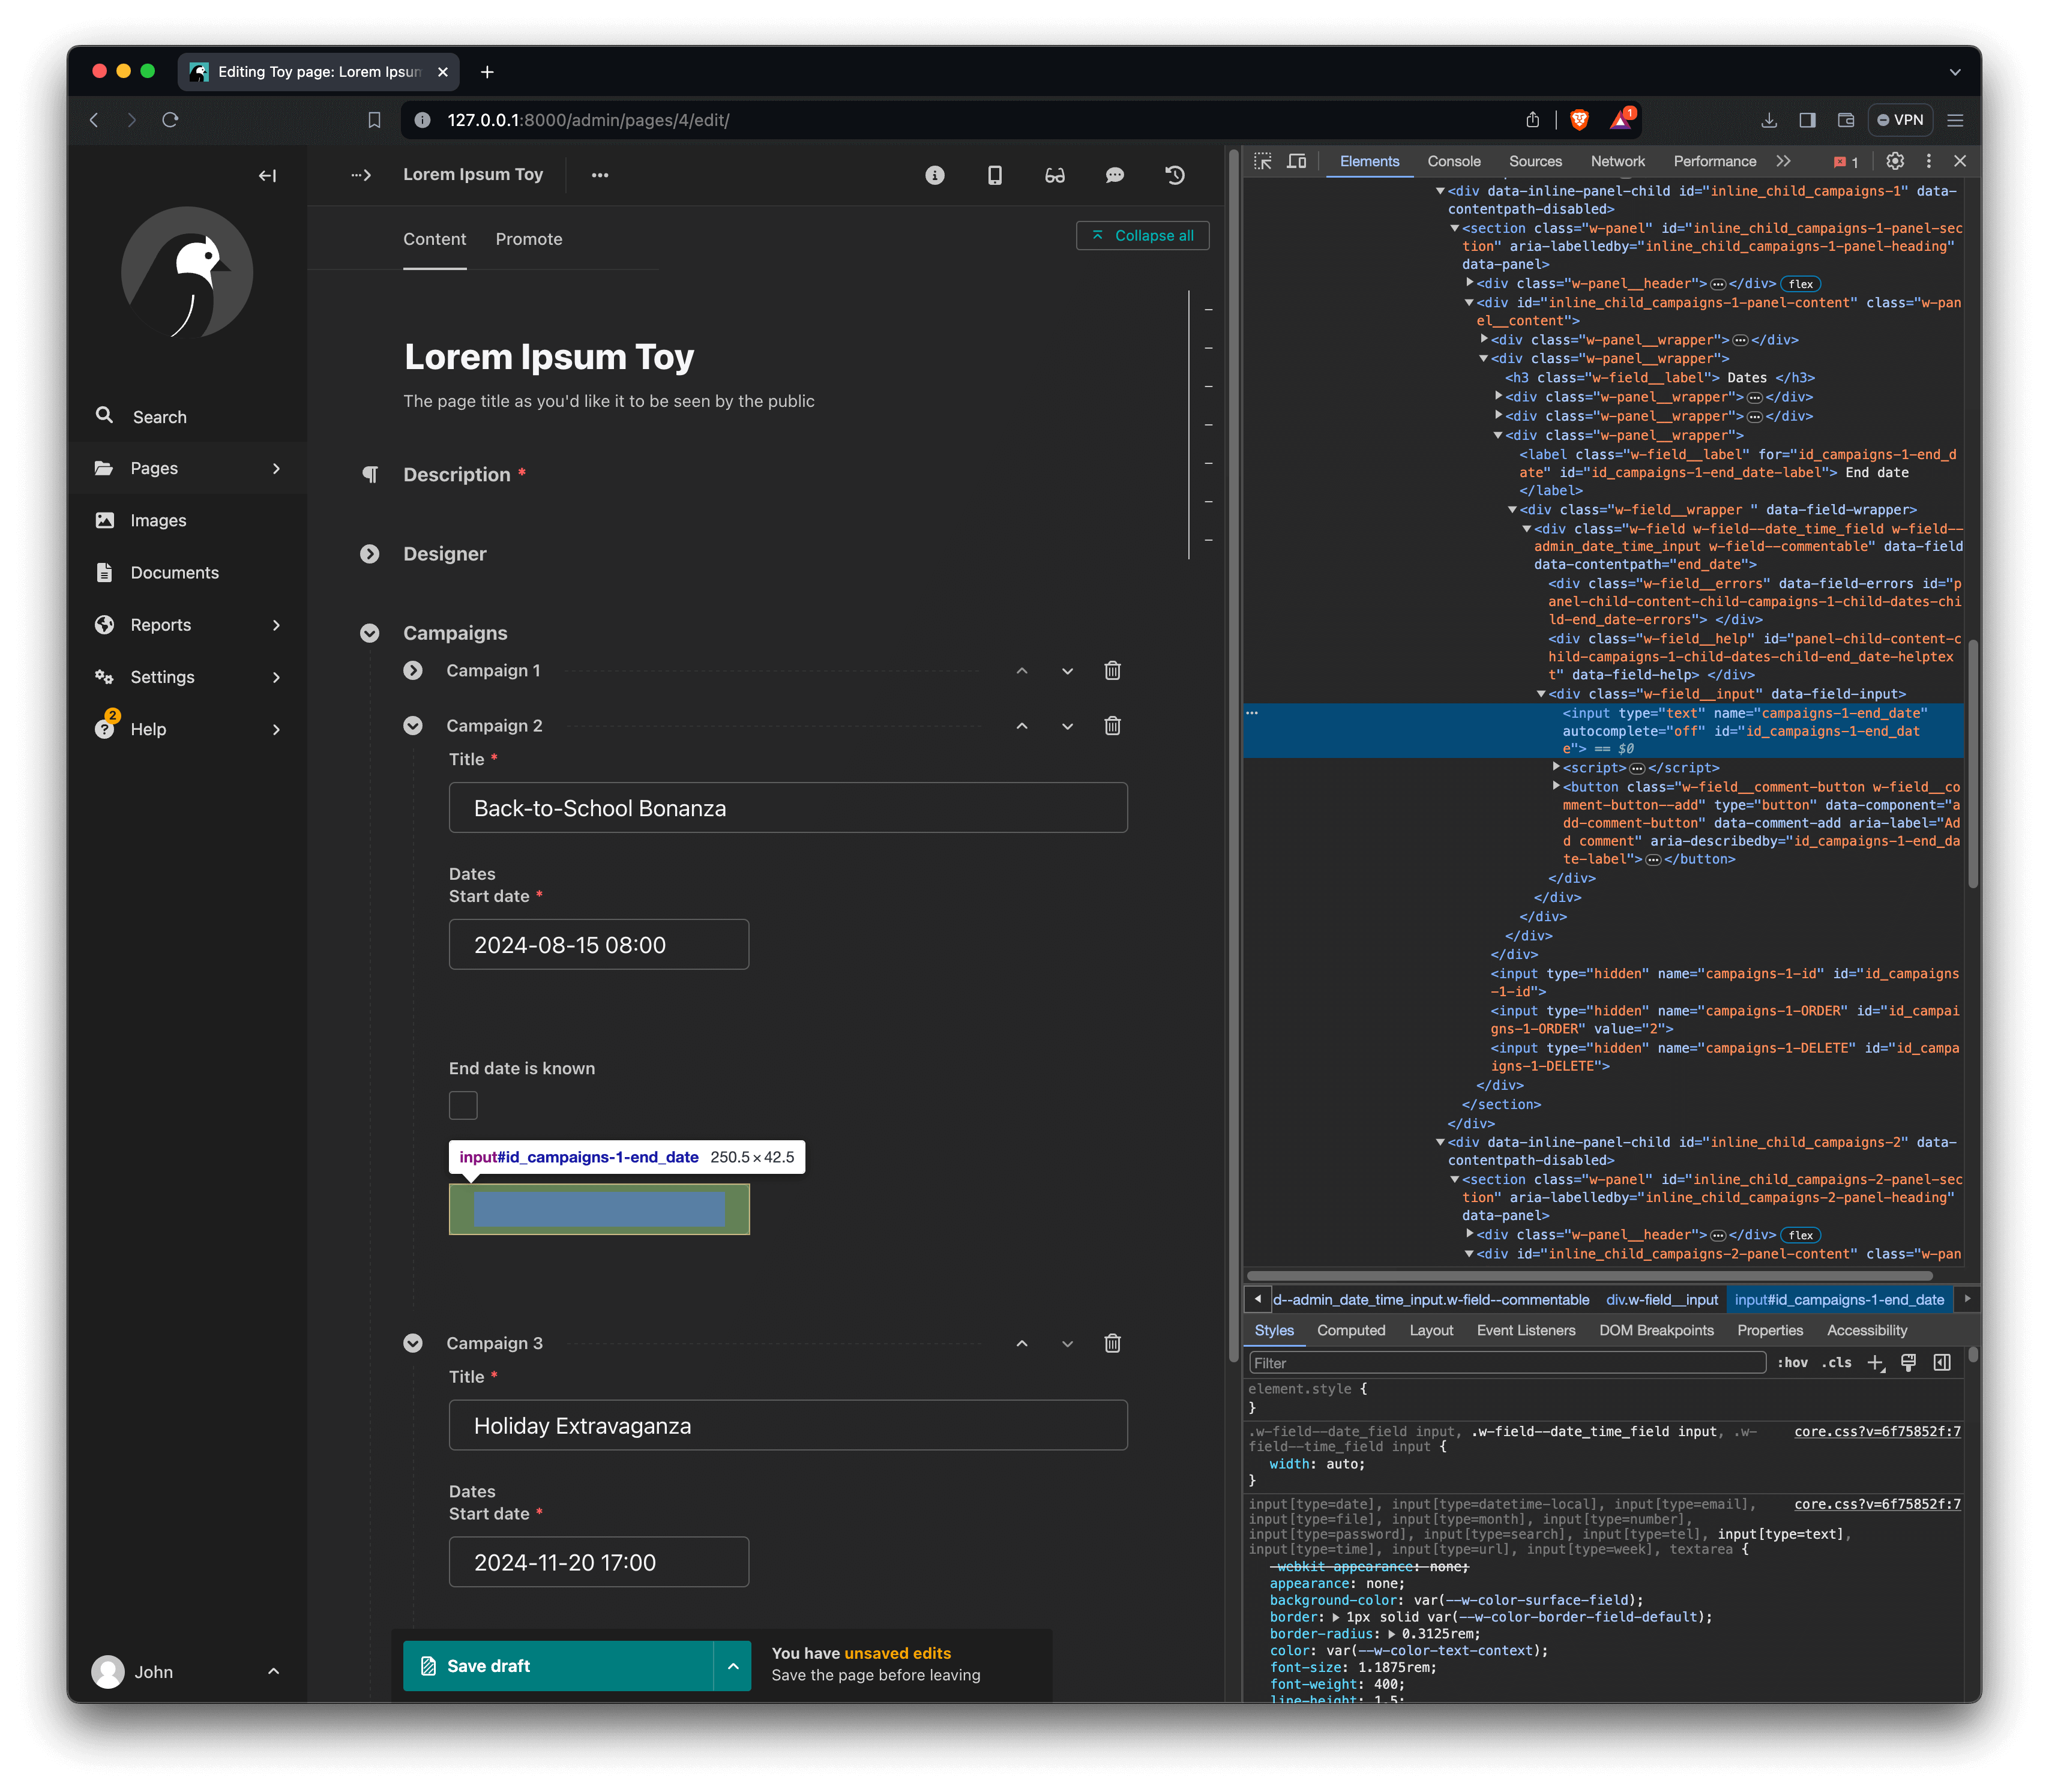
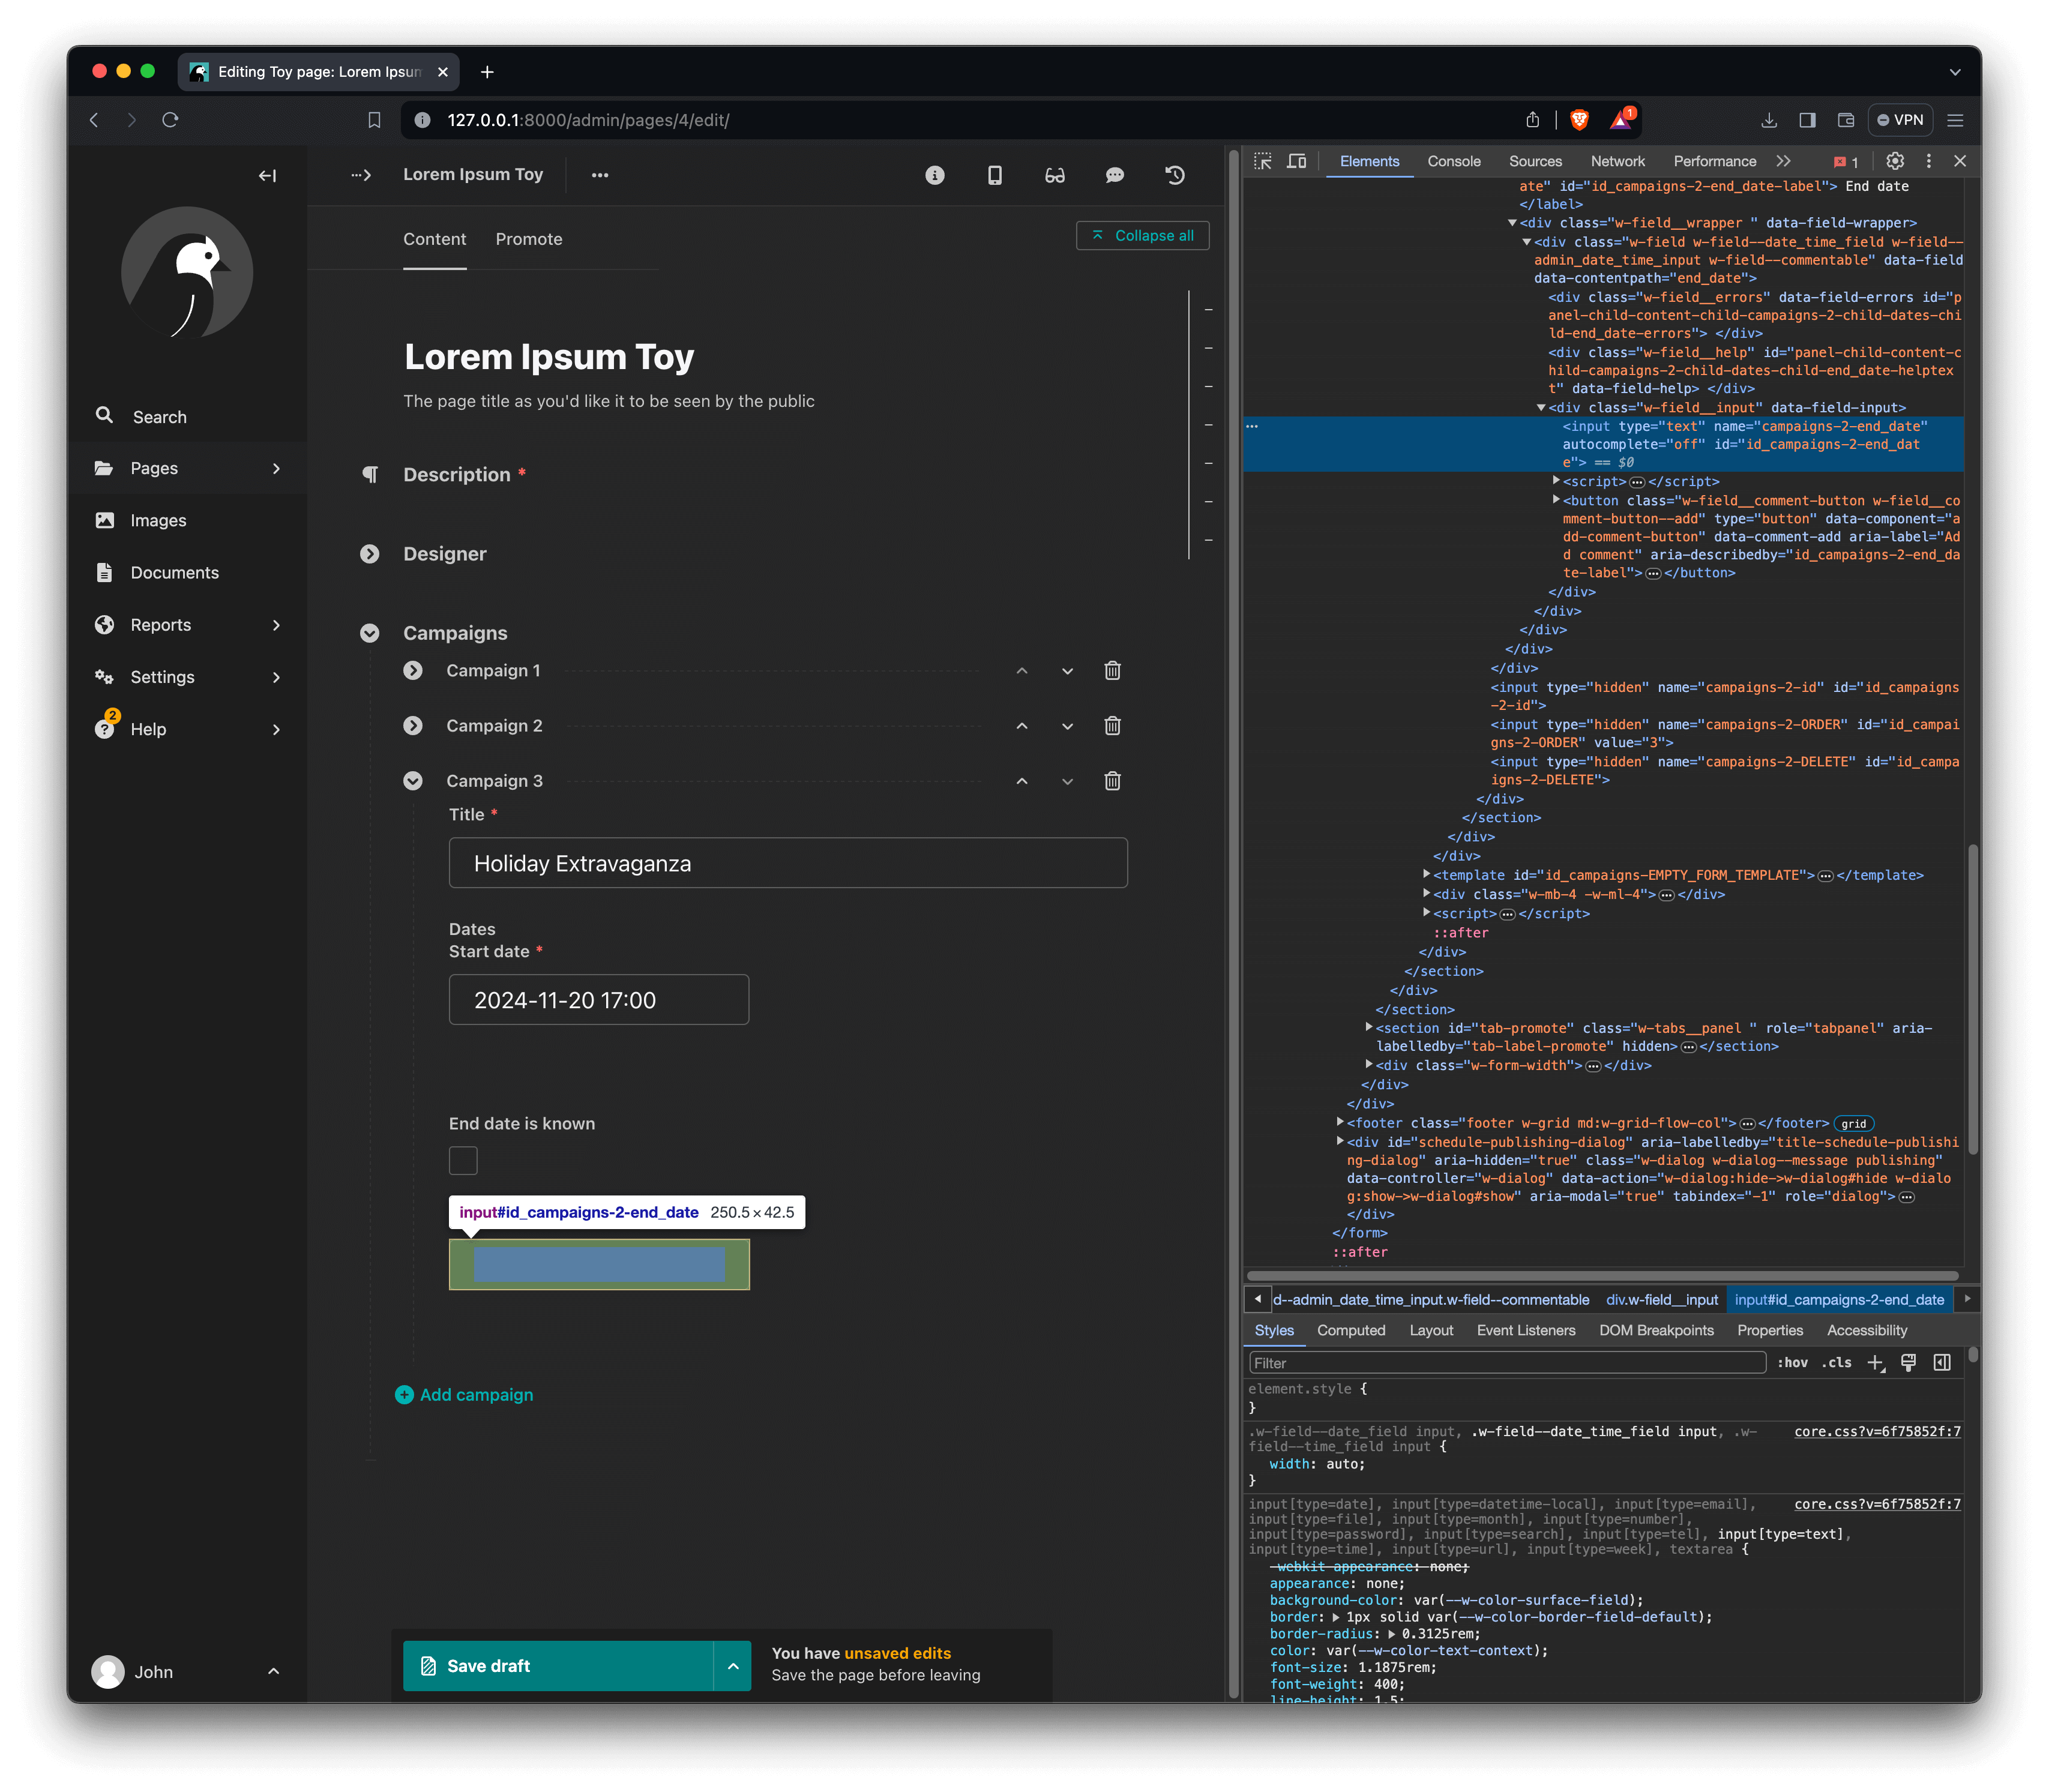
You will notice from the above screenshots that the markup for the end_date inputs in each InlinePanel looks like this (comments added for clarity):
<!-- Campaign 1 -->
<input
  type="text"
  name="campaigns-0-end_date"
  autocomplete="off"
  id="id_campaigns-0-end_date"
/>

<!-- Campaign 2 -->
<input
  type="text"
  name="campaigns-1-end_date"
  autocomplete="off"
  id="id_campaigns-1-end_date"
/>

<!-- Campaign 3 -->
<input
  type="text"
  name="campaigns-2-end_date"
  autocomplete="off"
  id="id_campaigns-2-end_date"
/>
Notice the incremental pattern in the name and id. Similarly, the checkboxes have this markup:
<!-- Campain 1 -->
<input
  type="checkbox"
  name="campaigns-0-end_date_is_known"
  id="id_campaigns-0-end_date_is_known"
/>

<!-- Campain 2 -->
<input
  type="checkbox"
  name="campaigns-1-end_date_is_known"
  id="id_campaigns-1-end_date_is_known"
/>

<!-- Campain 3 -->
<input
  type="checkbox"
  name="campaigns-2-end_date_is_known"
  id="id_campaigns-2-end_date_is_known"
/>
This makes things easier, right? We can see a pattern in the convention used for the input name and id. While this may help us address the first challenge, it may not entirely help us to address the second one. Why? Well, remember we said earlier that
Adding an event listener for the
DOMContentLoadedevent ensures that the code inside this function runs only when the DOM content is fully loaded and parsed.
When additional campaigns are added after the DOM content is fully loaded and parsed, our code will not work, if we follow the same approach as before. We therefore need to register an event listener on the "add campaign" button:
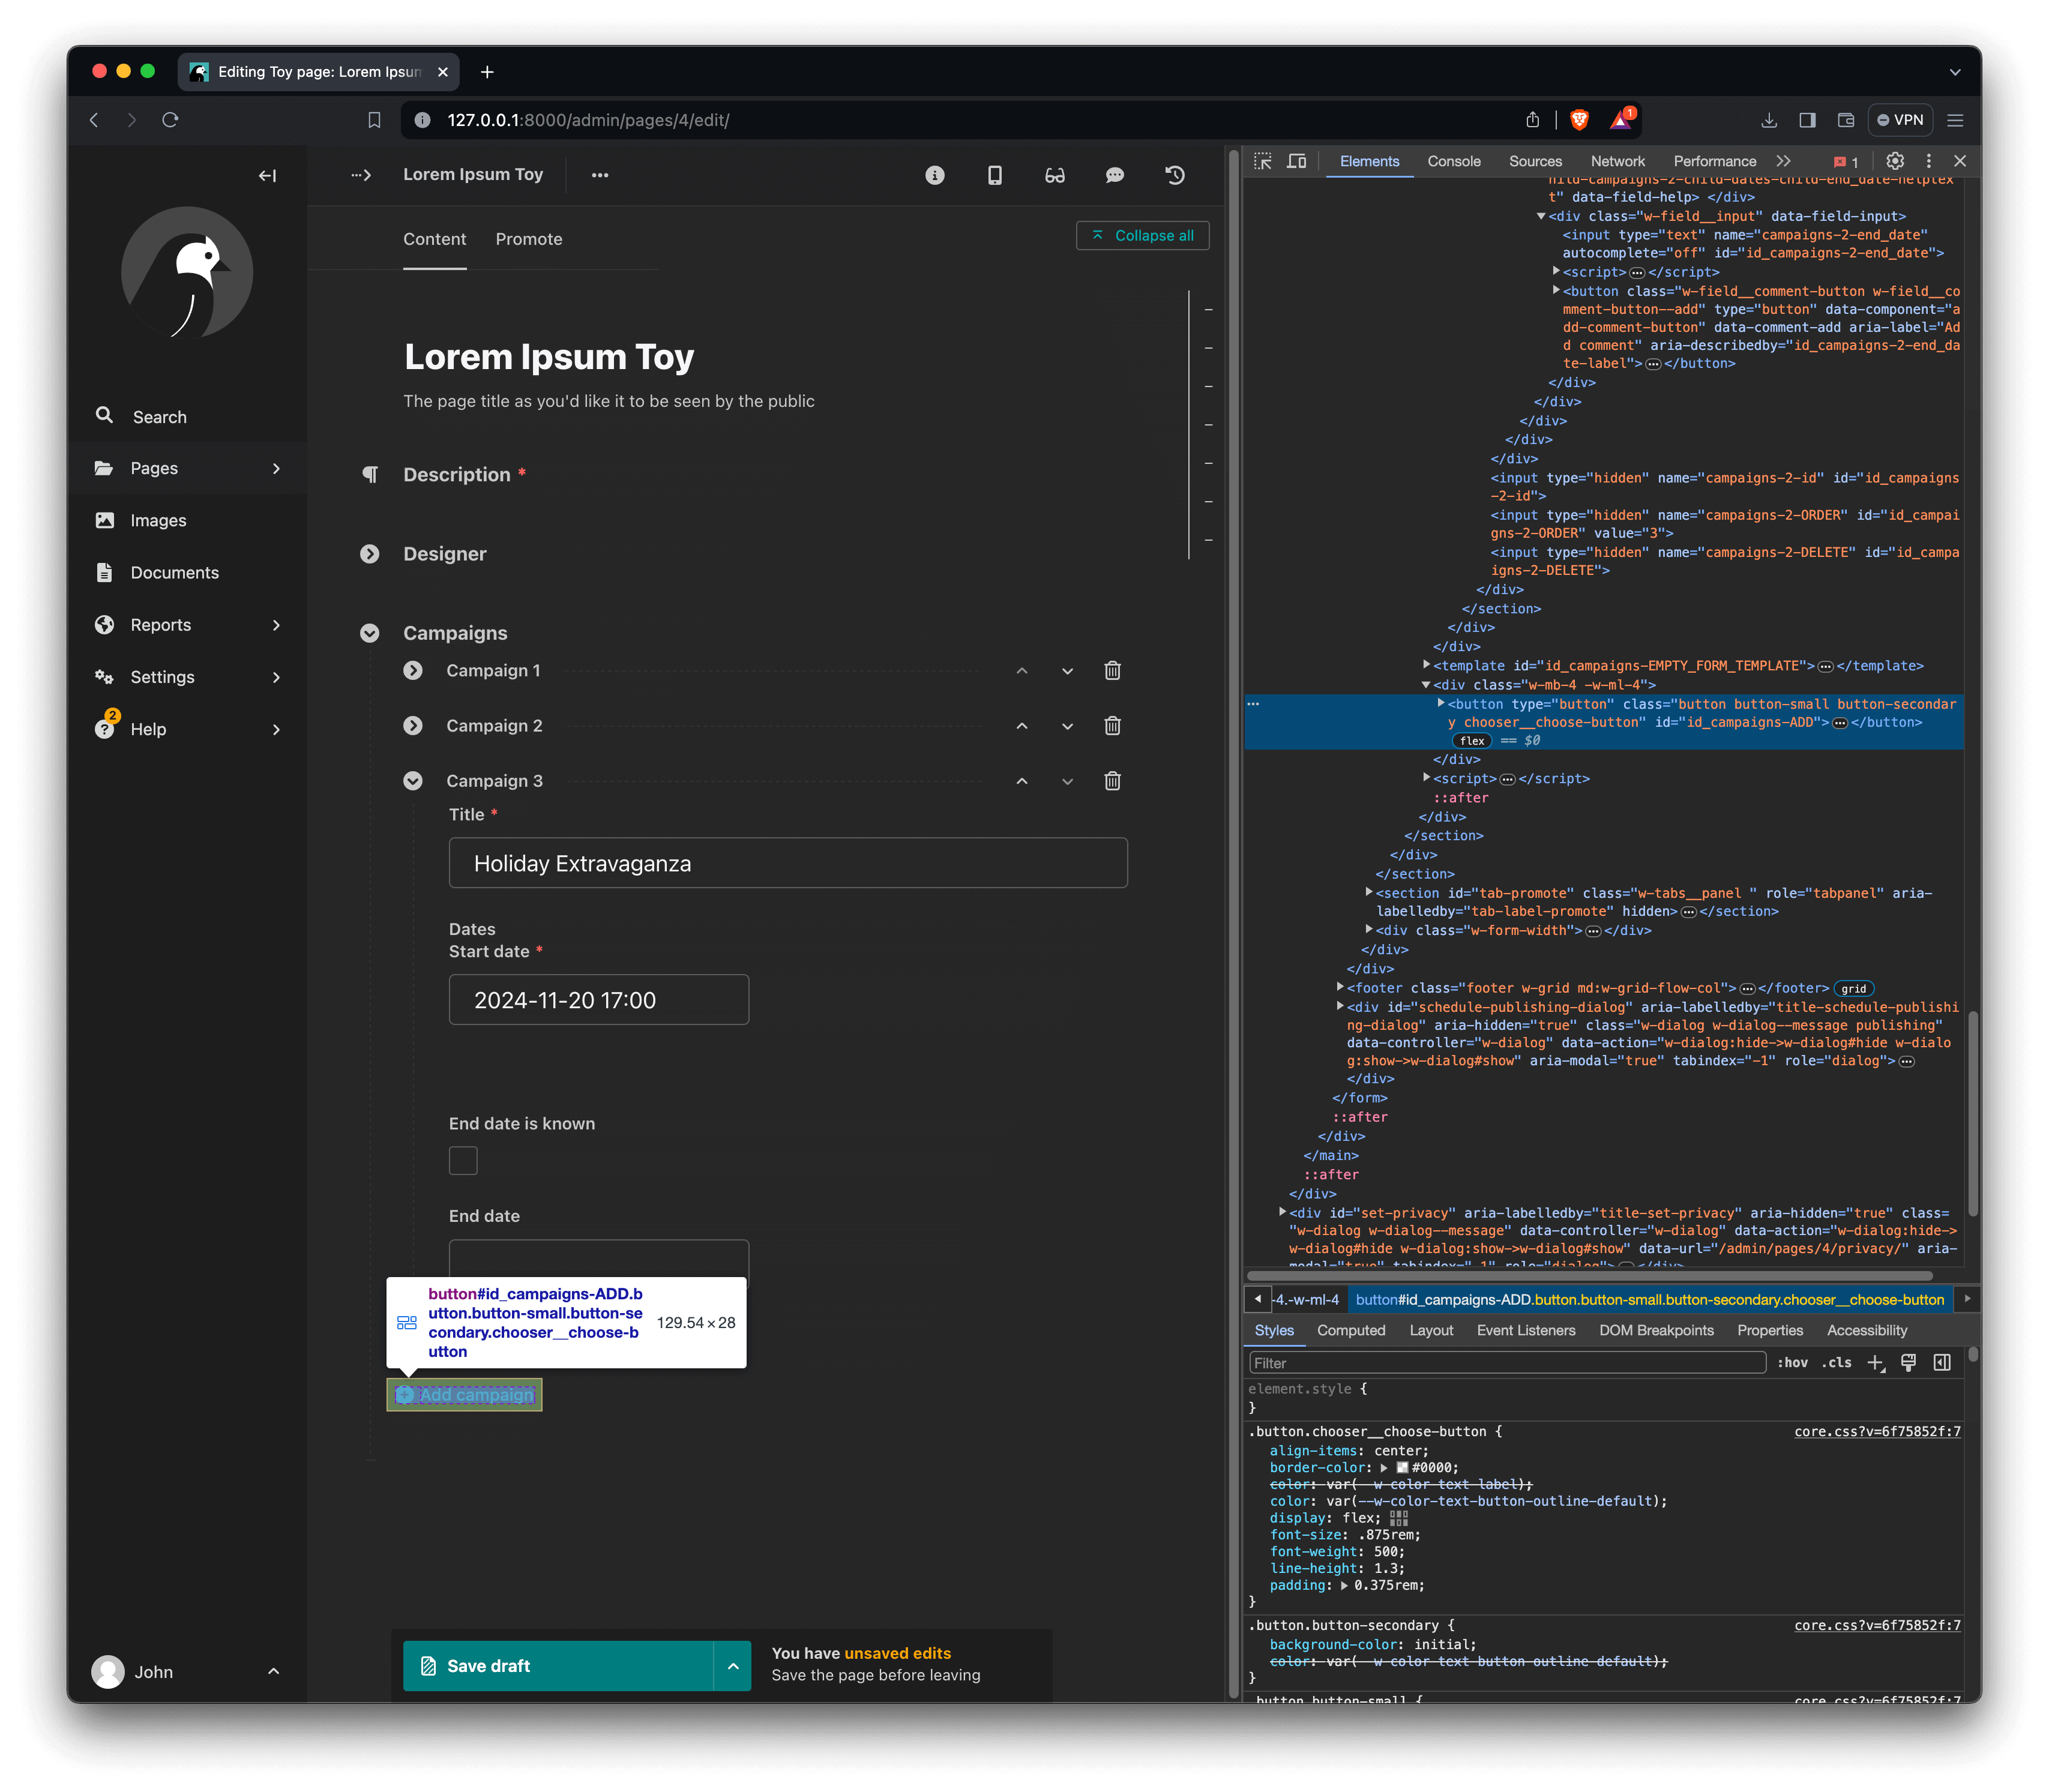
The button's markup is as follows:
<button
  type="button"
  class="button button-small button-secondary chooser__choose-button"
  id="id_campaigns-ADD"
>
  <svg class="icon icon-plus-inverse icon" aria-hidden="true">
    <use href="#icon-plus-inverse"></use></svg
  >Add campaign
</button>
Alright, talk is cheap, show me the code already! Well, I'm glad you asked, here it is, this time, we'll implement OOP to help keep things more structured:
/**
 * Toggles visibility of an `end_date` field's parent panel based on
 * its counterpart `end_date_is_known` checkbox state'.
 *
 * This is used on the page editor for ToyPages, specifically
 * on the **campaigns** InlinePanel.
 */
class EndDateVisibilityHandler {
  constructor() {
    this.namePrefix = '[name^="campaigns-"]';
    this.idPrefix = '[id^="id_campaigns-"]';
    this.checkboxes = document.querySelectorAll(
      `input[type="checkbox"]${this.namePrefix}${this.idPrefix}[id$="-end_date_is_known"]`
    );
    this.addButton = document.querySelector("#id_campaigns-ADD");
  }

  toggleEndDateField(checkbox) {
    const match = checkbox.id.match(/-(\d+)-end_date_is_known/);
    const identifier = match ? match[1] : null;

    if (identifier !== null) {
      const endDateField = document.getElementById(
        `id_campaigns-${identifier}-end_date`
      );
      const panelWrapper = endDateField.closest(".w-panel__wrapper");
      panelWrapper.style.display = checkbox.checked ? "block" : "none";
    }
  }

  initializeFields(checkboxes) {
    checkboxes.forEach((checkbox) => {
      checkbox.addEventListener("change", () =>
        this.toggleEndDateField(checkbox)
      );
    });
  }

  initializePage() {
    this.initializeFields(this.checkboxes);

    this.addButton.addEventListener("click", () => {
      const newCheckboxes = this.addButton
        .closest(".w-panel__content")
        .querySelectorAll(
          `input[type="checkbox"]${this.namePrefix}${this.idPrefix}[id$="-end_date_is_known"]`
        );
      this.initializeFields(newCheckboxes);
    });
  }
}

document.addEventListener("DOMContentLoaded", () => {
  const edvh = new EndDateVisibilityHandler();
  edvh.initializePage();
});
A few things to note:
Notice how we use the attribute selectors
[id^=]and[id$=](Reference) in selecting checkboxes withids that have an incremental pattern. We know that they have a constant prefix and constant suffix, so we make use of this convention.Once we select a checkbox, we use
String.prototype.match()to extract the number from the checkbox'sid, which we use to select the accompanyingendDateField.When the
addButtonis clicked, a newInlinePanelis created above the button. Once again, theclosest()method comes in handy here.
Here's what this looks like:
Awesome, right? Well, that's all folks! Have fun customizing your Wagtail project!
Please check out the accompanying GitHub repo if you would like to take a closer look and quickly try things out for yourself.